
In this article, I’ll walk you through the step-by-step process to deploy the Python application in Kubernetes. Also, I’ll talk about how to create/build and push on Docker-Hub our containerized application.
Kubernetes is an open-source platform that provides features for scaling, maintenance, and deployment. It offers portability, extensibility, and self-healing capabilities while making containerized Python application management simpler.
Whether your Python applications are straightforward or more complicated, Kubernetes enables you to deploy and scale them effectively, allowing for the smooth rollout of new features while only using the resources that are actually needed.
What you’ll get to learn
- Creating and building Python container images
- Publishing/pushing the container images to an image registry
- Working with persistent volumes
- Deploying the Python application to Kubernetes
Prerequisites
- Docker installed on your machine
- kubectl configured on your machine
- Simple python application(for this I’ll be using this source code)
Steps to Deploy the Python application in Kubernetes
Docker
Docker is an open-source platform for developers to build, run, ship, and manage distributed applications. To install Docker, follow the official documentation. To verify that Docker is successfully installed on your system run the following command:
$ docker info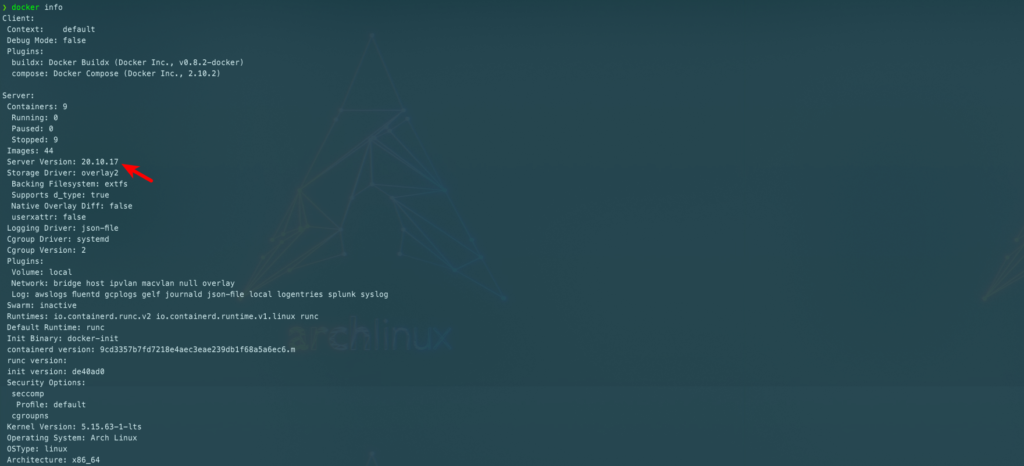
Kubectl
kubectl is a command-line interface for executing commands against a Kubernetes cluster. Run the following command script to install kubectl: (You can also refer to this official site to install kubectl)
curl -LO <https://storage.googleapis.com/kubernetes-release/release/$>(curl -s <https://storage.googleapis.com/kubernetes-release/release/stable.txt>)/bin/linux/amd64/kubectlNow to deploy the application on Kubernetes we need to containerize our application first. So, let’s containerized our application:
Containerization
Enclosing an application in a container with its own operating system is known as containerization. With full-machine virtualization, an application can be run on any machine without having to worry about dependencies.
Creating a Python docker image
After you have successfully set up docker and Kubernetes, let’s create a Python docker image of our Python application. Following is a Dockerfile for our Python application:
This is a Docker file for our Python application:
FROM python:3.10-alpine
MAINTAINER mail@budhathokisagar.com.np

# Creating Application Source Code Directory
RUN mkdir -p /k8s_python_sample_code/src

# Setting Home Directory for containers
WORKDIR /k8s_python_sample_code/src

# Installing Python dependencies
COPY requirements.txt /k8s_python_sample_code/src
RUN pip3 install --no-cache-dir -r requirements.txt

# Copying src code to Container
COPY . /k8s_python_sample_code/src/

# Application Environment variables
ENV APP_ENV development

# Exposing Ports
EXPOSE 5000

# Setting Persistent data
VOLUME ["/app-volume"]

# Running Python Application
CMD ["python", "app.py"]
This is our Docker file that contains instructions to run our demo Python code. It uses the Python 3.10-alpine development environment.
Building a Python docker image
Now let’s build our image using the following command:
$ docker build -t k8s_demo_app:latest .

Sending build context to Docker daemon  97.28kB
Step 1/11 : FROM python:3.10-alpine
3.10-alpine: Pulling from library/python
ca7dd9ec2225: Pull complete
9e124a36b9ab: Pull complete
3667c4d827e9: Pull complete
322b5bc612d6: Pull complete
ab28a729faca: Pull complete
Digest: sha256:00be2731a1c650d3573aebd84a46c06f3a3251377323f6f43ff1386e70ea2992
Status: Downloaded newer image for python:3.10-alpine
 ---> 98fb59a98736
Step 2/11 : MAINTAINER mail@budhathokisagar.com.np
 ---> Running in 51080478e4aa
Removing intermediate container 51080478e4aa
 ---> 122521554ae8
Step 3/11 : RUN mkdir -p /k8s_python_sample_code/src
 ---> Running in 901b40418719
Removing intermediate container 901b40418719
 ---> af13500a29f4
Step 4/11 : WORKDIR /k8s_python_sample_code/src
 ---> Running in 9964eced3b78
...
Here, our image is built successfully, you can check the built image by running the following command:
docker images

REPOSITORY     TAG           IMAGE ID       CREATED              SIZE
k8s_demo_app   latest        cd104e98236c   About a minute ago   59.5MB
Publishing the container image
To deploy a Python application in Kubernetes we need to publish our docker image to some repository. (OR you can store your image locally and use that image to deploy in Kubernetes)
Note: Also,check out the article: how to deploy the locally built docker image in Kubernetes.
We can push or publish our Python container image to different private/public cloud repositories, like Docker Hub, AWS ECR, Google Container Registry, etc. For this tutorial, we’ll use Docker Hub.
Before publishing the image, we need to tag it to a version:
$ docker tag k8s_demo_app:latest k8s_demo_app:0.1.0Pushing the image to a cloud repository
Using a Docker registry other than Docker Hub to store images requires you to add that container registry to the local Docker daemon and Kubernetes Docker daemons. You can look up this information for the different cloud registries. We’ll use Docker Hub in this example.
To push an image to Docker Hub, you must first name your local image using your Docker Hub username and the repository name that you created through Docker Hub on the web.
Name your local images using one of these methods:
- Build using
docker build -t <hub-user>/<repo-name>[:<tag>] - Re-tag an existing local image
docker tag <existing-image> <hub-user>/<repo-name>[:<tag>] - Use
docker commit <existing-container> <hub-user>/<repo-name>[:<tag>]to commit changes
Run the following Docker command to push the image:
$ docker push <hub-user>/<repo-name>[:<tag>]Now your image is successfully pushed to the Docker Hub repository.
Working with CephFS persistent storage
Various persistent storage providers are supported by Kubernetes, including AWS EBS, CephFS, GlusterFS, Azure Disk, NFS, etc. In this, I’ll talk about CephFS persistence storage for Kubernetes.
Learn more about CephFS on their Official Site.
Myself
To use CephFS for persistent data to Kubernetes containers, create two files:
persistent_volume.yml
apiVersion: v1
kind: PersistentVolume
metadata:
  name: app-disk1
  namespace: k8s_demo_app
spec:
  capacity:
  storage: 50Gi
  accessModes:
  - ReadWriteMany
  cephfs:
  monitors:
    - "172.17.0.1:6789"
  user: sagar
  secretRef:
    name: ceph-secret
  readOnly: false
persistent_volume_claim.yaml
apiVersion: v1
kind: PersistentVolumeClaim
metadata:
  name: app-claim1
  namespace: k8s_demo_app
spec:
  accessModes:
  - ReadWriteMany
  resources:
  requests:
    storage: 10Gi
Now create the persistent volume and claim to the Kubernetes cluster:
$ kubectl create -f persistent_volume.yml
$ kubectl create -f persistent_volume_claim.yml
Finally, it’s time to deploy our application.
Deploy the Python application in Kubernetes
To deploy the Python application in Kubernetes, create two files: service.yaml and deployment.yaml.
Create a file and name it k8s_demo_app.service.yml with the following content:
apiVersion: v1
kind: Service
metadata:
  labels:
  k8s-app: k8s_demo_app
  name: k8s_demo_app
  namespace: k8s_demo_app
spec:
  type: NodePort
  ports:
	  - port: 5000
  selector:
	  k8s-app: k8s_demo_app
Create a file and name it k8s_demo_app.deployment.yml with the following content:
apiVersion: extensions/v1beta1
kind: Deployment
metadata:
  name: k8s_demo_app
  namespace: k8s_demo_app
spec:
  replicas: 1
  template:
  metadata:
    labels:
    k8s-app: k8s_demo_app
  spec:
    containers:
    - name: k8s_demo_app
      image: k8s_demo_app:0.1.0
      imagePullPolicy: "IfNotPresent"
      ports:
      - containerPort: 5000
      volumeMounts:
        - mountPath: /app-volume
          name: k8s_demo_app
     volumes:
         - name: <name of application>
           persistentVolumeClaim:
             claimName: app-claim1
Finally, use kubectl to deploy the application to Kubernetes:
$ kubectl create -f k8s_python_sample_code.deployment.yml
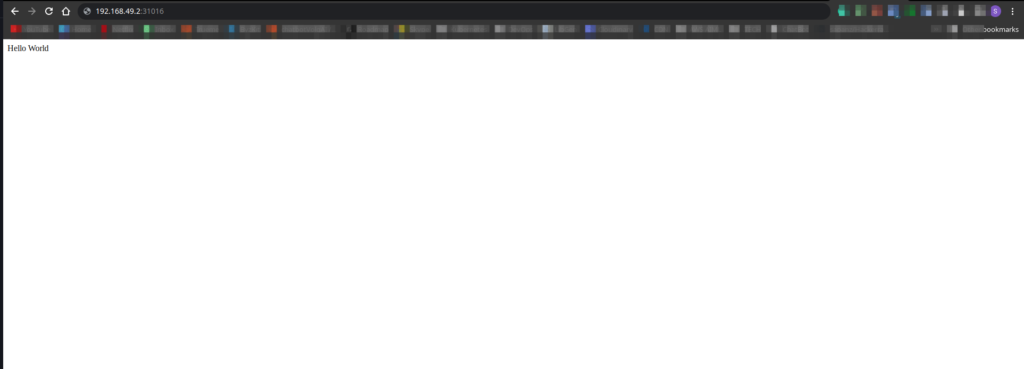
$ kubectl create -f k8s_python_sample_code.service.ymlYour application was successfully deployed to Kubernetes.
You can verify whether your application is running by inspecting the running services: (you’ll see similar like this)
$ kubectl get services

NAME                  TYPE       CLUSTER-IP       EXTERNAL-IP   PORT(S)          AGE
k8s_demo_app          NodePort   10.103.225.143   <none>        5000:31016/TCP   2m
Now you can access your application from <NodeIP>:<NodePort>. In my case I’m using minikube so it would be http://<Minikube_IP>:<NodePort> i.e. http://192.168.2.49:31016

Note: If you are using minikube as a Kubernetes cluster and want to know more in a detailed way, you can follow the article I’ve written already => here.
In this way, you deploy the python application in Kubernetes. OR any other application.
That’s it!!
Conclusion
In this article, we discussed how to deploy the python application in Kubernetes. And also creating, building, and pushing the container image to the cloud of our application.
Other articles on Kubernetes:
Thank you!!