
In this article, I’ll demonstrate how Linting Docker image with dockle works. By the end of this post, you’ll get to know in detail about linting docker image with dockle.
You need to lint the container docker images to enforce security aspects of container images which minimize the attack layers by hardening the individual container images. And it is the best security practice pattern to use linting along with vulnerability scanning.
Dockle
Dockle is a linter for container images. Dockle, in comparison to other linters, gives us confidence that our container images were built in accordance with well-known, proven security best practices. Dockle, for example, verifies many best practices specified as part of the CIS benchmarks. It is also critical to remember that Dockle does not lint Dockerfiles. Container images are linted.
Prerequisites
- Understanding of docker
- docker configured on your system
Set Up: Linting Docker image with Dockle
Now, you know a bit about Dockle. So, let’s get dive into the practical implementation of Dockle:
Dockle Installation
On Linux
You can install Dockle on Linux in a different way according to your distribution. [In my case, I’m using Arch-based Linux so I’ll be using Arch User Repository(AUR)] {First Priority :-)}
For Arch-based distro
# clone the repo
$ git clone <https://aur.archlinux.org/dockle-bin.git>

$ cd dockle-bin

# build and install the package
$ makepkg -sri
For Ubuntu/Debian
$ VERSION=$(
 curl --silent "<https://api.github.com/repos/goodwithtech/dockle/releases/latest>" | \\
 grep '"tag_name":' | \\
 sed -E 's/.*"v([^"]+)".*/\\1/' \\
) && curl -L -o dockle.deb <https://github.com/goodwithtech/dockle/releases/download/v${VERSION}/dockle_${VERSION}_Linux-64bit.deb>

# Extract and delete the pakage
$ sudo dpkg -i dockle.deb && rm dockle.deb
For RHEL/CentOS
$ VERSION=$(
 curl --silent "<https://api.github.com/repos/goodwithtech/dockle/releases/latest>" | \\
 grep '"tag_name":' | \\
 sed -E 's/.*"v([^"]+)".*/\\1/' \\
) && rpm -ivh <https://github.com/goodwithtech/dockle/releases/download/v${VERSION}/dockle_${VERSION}_Linux-64bit.rpm>
On Windows
Run the following in the command prompt:
$ VERSION=$(
 curl --silent "<https://api.github.com/repos/goodwithtech/dockle/releases/latest>" | \\
 grep '"tag_name":' | \\
 sed -E 's/.*"v([^"]+)".*/\\1/' \\
) && curl -L -o dockle.zip <https://github.com/goodwithtech/dockle/releases/downlLinting docker image with dockleoad/v${VERSION}/dockle_${VERSION}_Windows-64bit.zip>

# Extract and delete the ZIP archive
$ unzip dockle.zip && rm dockle.zip
$ ./dockle.exe [IMAGE_NAME]
On MacOS
For Mac, you can use Homebrew;
$ brew install goodwithtech/r/dockleImplementation: Linting docker image with dockle
It’s time to lint some images now that you’ve installed dockle-CLI on your machine. If you’re already using container technologies, you probably have some container images on your local machine. However, for the sake of demonstration, let’s create a simple web server image.
Create and build sample web server image
To do so create a file Dockerfile and add the following lines:
FROM nginx:alpine
EXPOSE 80
Build the container by running the following command:
$ docker build -t example:latest .

Sending build context to Docker daemon  2.048kB
Step 1/2 : FROM nginx:alpine
alpine: Pulling from library/nginx
c158987b0551: Pull complete
1e35f6679fab: Pull complete
cb9626c74200: Pull complete
b6334b6ace34: Pull complete
f1d1c9928c82: Pull complete
9b6f639ec6ea: Pull complete
ee68d3549ec8: Pull complete
Digest: sha256:dd8a054d7ef030e94a6449783605d6c306c1f69c10c2fa06b66a030e0d1db793
Status: Downloaded newer image for nginx:alpine
 ---> 1e415454686a
Step 2/2 : EXPOSE 80
 ---> Running in bbfb3fd7cb20
Removing intermediate container bbfb3fd7cb20
 ---> 0ccb22ae7702
Successfully built 0ccb22ae7702
Successfully tagged example:latest
Linting docker image with dockle
Now, let’s lint the container image using Dockle CLI command:
$ dockle example:latestOutput:
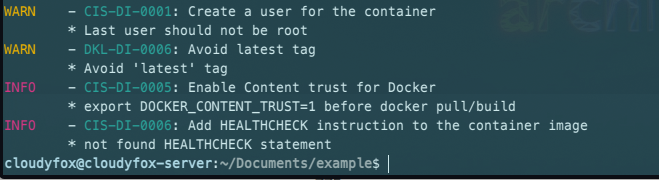
Explanation
As you can see, we have a number of warnings and information. Although we can address the majority of the issues by updating our Dockerfile, CIS-DI-0005 requires you to configure your local Docker installation to sign container images (Docker Content Trust). We can also address DKL-DI-0006 by constructing our image with a tag other than the latest. First, let’s address any issues that we discovered in the Dockerfile. Update the Dockerfile as shown in the example below:
FROM nginx:alpine
EXPOSE 80

# Adding health check to address CIS-DI-0006
HEALTHCHECK --interval=30s --timeout=2s --start-period=5s --retries=3 CMD curl -f <http://localhost/index.html> || exit 1

# Add a new user in a group(new in this case)
RUN addgroup -S cloudyfox && adduser -S sagar -G cloudyfox \\
 && mkdir -p /var/run/nginx /var/tmp/nginx \\
 && chown -R sagar:cloudyfox /usr/share/nginx /var/run/nginx /var/tmp/nginx

# Copy custom NGINX configuration to the image
COPY nginx.conf /etc/nginx/nginx.conf

# Switch user context to address CIS-DI-0001
USER sagar:cloudyfox
Now, again create a nginx.conf configuration file in the same directory as Dockerfile and add the following snippet:
worker_processes 1;
error_log /var/log/nginx/error.log warn;
pid    /var/run/nginx/nginx.pid;
events {
  worker_connections 1024;
}
http {
  client_body_temp_path /var/tmp/nginx/client_body;
  fastcgi_temp_path /var/tmp/nginx/fastcgi_temp;
  proxy_temp_path /var/tmp/nginx/proxy_temp;
  scgi_temp_path /var/tmp/nginx/scgi_temp;
  uwsgi_temp_path /var/tmp/nginx/uwsgi_temp;
  include    /etc/nginx/mime.types;
  default_type application/octet-stream;
  log_format main '$remote_addr - $remote_user [$time_local] "$request" '
           '$status $body_bytes_sent "$http_referer" '
           '"$http_user_agent" "$http_x_forwarded_for"';
  access_log /var/log/nginx/access.log main;
  sendfile    on;
  keepalive_timeout 65;
  include /etc/nginx/conf.d/*.conf;
}
Finally, let’s build again our Dockerfile with the tag as 0.1.0 which addresses DKL-DI-0006:
$ docker build -t example:0.1.0 .

Sending build context to Docker daemon  4.096kB
Step 1/6 : FROM nginx:alpine
 ---> 1e415454686a
Step 2/6 : EXPOSE 80
 ---> Using cache
 ---> 0ccb22ae7702
Step 3/6 : HEALTHCHECK --interval=30s --timeout=2s --start-period=5s --retries=3 CMD curl -f <http://localhost/index.html> || exit 1
 ---> Running in ad633cc5a53f
Removing intermediate container ad633cc5a53f
 ---> 85e8fae17637
Step 4/6 : RUN addgroup -S cloudyfox && adduser -S sagar -G cloudyfox  && mkdir -p /var/run/nginx /var/tmp/nginx  && chown -R sagar:cloudyfox /usr/share/nginx /var/run/nginx /var/tmp/nginx
 ---> Running in 197fe5351548
Removing intermediate container 197fe5351548
 ---> 3f2d6651de9e
Step 5/6 : COPY nginx.conf /etc/nginx/nginx.conf
 ---> 1902f88b672c
Step 6/6 : USER sagar:cloudyfox
 ---> Running in b4d9cd554de9
Removing intermediate container b4d9cd554de9
 ---> bc03ec6dd426
Successfully built bc03ec6dd426
Now, lint the docker image:
$ dockle example:0.1.0

INFO    - CIS-DI-0005: Enable Content trust for Docker
        * export DOCKER_CONTENT_TRUST=1 before docker pull/build
And let’s enable Content trust for Docker:
$ export DOCKER_CONTENT_TRUST=1Again build the new version with 0.1.1 and lint the docker container image:
$ docker build -t example:0.1.1 .Now, you don’t see any warnings or findings, which means you have successfully passed the dockle linting test.
That’s it.
Conclusion
In this, we practically went through linting docker image with dockle, why container images should be linted and how we can use dockle as a linter along with the installation process.
In short, you learned linting container images with Dockle which will discover weak container images and provide detailed information about how to improve, harden, and optimize our container images.
Thank you!
Wait! before leaving, check out my other article on Python FastAPI SSL With Traefik and Docker Compose.