
In this, we’ll discuss how to deploy locally built docker image in Kubernetes.
Since minikube uses its own local Docker registry that’s not connected to the one on your local machine, you need to do something to make it work. In this, we’ll have a practical example of using local images without publishing them to a global registry.
Prerequisites
Run locally built docker image in Kubernetes
Step-1: Create a Docker image from a Dockerfile.
First, let’s create a simple docker image by defining a Dockerfile that runs busybox and outputs “Hello Folks”:
FROM busybox
CMD [“echo”, “Hello Folks!”]
Now, build the docker image with a tag(using -t):
$ docker build -t sagar/hello-folks .Output:
$ docker build -t sagar/hello-folks .

Sending build context to Docker daemon  14.34kB
Step 1/2 : FROM busybox
latest: Pulling from library/busybox
50783e0dfb64: Pull complete
Digest: sha256:ef320ff10026a50cf5f0213d35537ce0041ac1d96e9b7800bafd8bc9eff6c693
Status: Downloaded newer image for busybox:latest
 ---> 7a80323521cc
Step 2/2 : CMD [“echo”, “Hello Folks!”]
 ---> Running in ca81b2dac9bd
Removing intermediate container ca81b2dac9bd
 ---> 7deaf89a224a
Successfully built 7deaf89a224a
Successfully tagged sagar/hello-folks:latest
Now run the following command to run the image we just built:
> docker run sagar/hello-folks

Hello Folks!
Perfect, the container is working.
Step-2: Create Kubernetes Job to run the container
Now let’s create the hello.yml configuration file to run our container as a Kubernetes job:
apiVersion: batch/v1
kind: Job
metadata:
  name: hello-folks
spec:
  template:
    metadata:
      name: hello-folks-pod
    spec:
      containers:
      - name: hello-folks
        image: sagar/hello-folks
      restartPolicy: Never
Here, we have specified the name of the image that we just built and set the restartPolicy to Never so that it would only run once and terminate.
Let’s run the kubectl to create the job from this configuration file (hello.yml):
$ kubectl create -f hello.yml
Output:
$ kubectl create -f hello.yml

job.batch/hello-folks created
Let’s check if it worked, using the kubectl get pods command:
$ kubectl get pods

NAME                READY   STATUS             RESTARTS   AGE
hello-folks-2tjfw   0/1     ImagePullBackOff   0          90s
It didn’t work, and the pod failed with the ImagePullBackOff status. This is because the Kubernetes tries to pull the image specified in hello.yml, but the image is neither in the minikube docker registry nor in the public Docker registry.
To make the local image available and accessible for Kubernetes you need to add imagePullPolicy. So, let’s fix the issue using local images by setting the imagePullPolicy for the image to Never:
apiVersion: batch/v1
kind: Job
metadata:
  name: hello-folks
spec:
  template:
    metadata:
      name: hello-folks-pod
    spec:
      containers:
      - name: hello-world
        image: sagar/hello-folks
imagePullPolicy: Never
      restartPolicy: Never
Let’s remove the job and create it once again:
$ kubectl delete -f hello.yml

job.batch "hello-folks" deleted

$ kubectl create -f hello.yml

job.batch/hello-folks created
Step-3: Configure docker-env for minikube
Now, let’s check the pods:
$ kubectl get pods

NAME                READY   STATUS              RESTARTS   AGE
hello-folks-2x55b   0/1     ErrImageNeverPull   0          92s
Here, we’ll see another error as — ErrImageNeverPull. This means that the minikube node uses its own Docker repository that’s not connected to the Docker registry on the local machine, so without pulling, it doesn’t know where to get the image from.
To fix this, we need to use the minikube docker-env command that outputs environment variables needed to point the local Docker daemon to the minikube internal Docker registry:
$ minikube docker-env
export DOCKER_TLS_VERIFY="1"
export DOCKER_HOST="tcp://192.168.59.109:2376"
export DOCKER_CERT_PATH="/home/sagar/.minikube/certs"
export MINIKUBE_ACTIVE_DOCKERD="minikube"

# To point your shell to minikube's docker-daemon, run:
# eval $(minikube -p minikube docker-env)
To apply these variables, use the following command:
$ eval $(minikube -p minikube docker-env)we now need to build the image once again, so that it’s installed in the minikube registry, instead of the local one:
> docker build -t sagar/hello-folks .Output:
$ docker build -t sagar/hello-folks .

Sending build context to Docker daemon  15.36kB
Step 1/2 : FROM busybox
latest: Pulling from library/busybox
50783e0dfb64: Pull complete
Digest: sha256:ef320ff10026a50cf5f0213d35537ce0041ac1d96e9b7800bafd8bc9eff6c693
Status: Downloaded newer image for busybox:latest
 ---> 7a80323521cc
Step 2/2 : CMD ["echo", "Hello Folks!"]
 ---> Running in 8f0443b23162
Removing intermediate container 8f0443b23162
 ---> 79ab97e14e1d
Successfully built 79ab97e14e1d
Successfully tagged sagar/hello-folks:latest
Again let’s re-create the job:
$ kubectl delete -f hello.yml
$ kubectl create -f hello.yml
Now kubectl get pods shows that the hello-world pod has completed successfully. Which is the result we want:
$ kubectl get pods

NAME                READY   STATUS      RESTARTS   AGE
hello-folks-7rxd8   0/1     Completed   0          13s
Check the logs of the pod to see the output of the container:
$ kubectl logs hello-folks-7rxd8

Hello Folks!
One thing to remember is that the command eval $(minikube -p minikube docker-env) has to be run in every new terminal window before you build an image. Or you can make it permanent by using it in your .profile file.
Once more you can see the jobs you’re running in the Kubernetes cluster with the command:
$ kubectl get jobs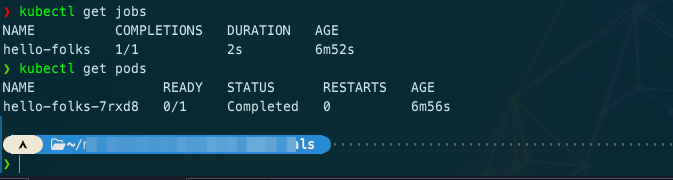
And, that’s all folks!
Conclusion
In this article, we demonstrated how to run/deploy a locally built docker image in your Kubernetes cluster by setting up docker-env in minikube and changing some values on Kubernetes Job .yml file.