

In this article, you’ll get to learn how to use GitLab as Helm Chart Registry with packaging and pushing using GitLab CI.
Kubernetes Helm Chart
Charts are the packaging format that Helm utilizes. A chart is a group of files that list several Kubernetes resources that are related to one another. One chart may be used to deploy a simple pod, something straightforward, or an entire web app architecture, including HTTP servers, databases, caches, and other various components.
Prerequisites
- Understanding of Kubernetes and setup on your machine
- Basic understanding of Helm and installed on your machine
- GitLab account
Set up GitLab as Helm chart Registry
Creating a Helm Chart
In this article, a Helm chart will be created, pushed to the GitLab project, packaged, and made available on the GitLab Package Registry. Which we can use later to install on our Kubernetes clusters.
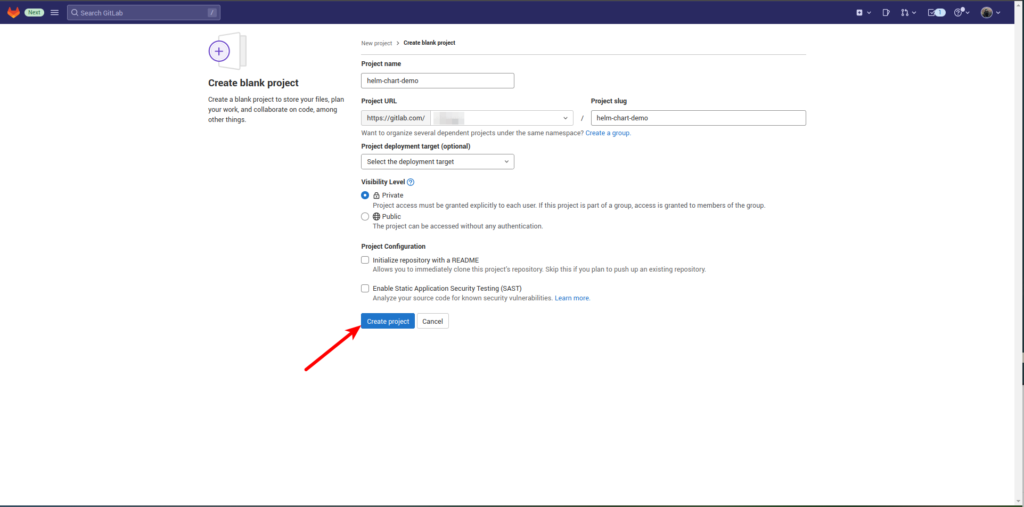
Now, first, let’s create a project on GitLab, where you’ll store templates of the chart.
Now, let’s create a chart locally. To create the helm chart run the following command: (Make sure you have already installed helm on your machine or install it.)
$ helm create demo-chartThis command will create a chart directory with some common general files and directories which will be used in a chart. For example, our demo-chart has the following project structure under the directory name demo-chart/:
.
├── charts
├── Chart.yaml
├── templates
│   ├── deployment.yaml
│   ├── _helpers.tpl
│   ├── hpa.yaml
│   ├── ingress.yaml
│   ├── NOTES.txt
│   ├── serviceaccount.yaml
│   ├── service.yaml
│   └── tests
│       └── test-connection.yaml
└── values.yaml

3 directories, 10 files
Now let’s just push to the helm-chart-demo project repository on GitLab:
$ cd demo-chart
$ git init --initial-branch=main
$ git remote add origin git@gitlab.com:<username>/helm-chart-demo.git
Here, you can use https URL if you haven’t set up ssh already. Now commit and push the changes:
$ git add .
$ git commit -m "demo-chart first commit"

[main (root-commit) 506893a] demo-chart first commit
 11 files changed, 405 insertions(+)
 create mode 100644 .helmignore
 create mode 100644 Chart.yaml
 create mode 100644 templates/NOTES.txt
 create mode 100644 templates/_helpers.tpl
 create mode 100644 templates/deployment.yaml
 create mode 100644 templates/hpa.yaml
 create mode 100644 templates/ingress.yaml
 create mode 100644 templates/service.yaml
 create mode 100644 templates/serviceaccount.yaml
 create mode 100644 templates/tests/test-connection.yaml
 create mode 100644 values.yaml
$ git push origin main
Enumerating objects: 15, done.
Counting objects: 100% (15/15), done.
Delta compression using up to 8 threads
Compressing objects: 100% (14/14), done.
Writing objects: 100% (15/15), 5.47 KiB | 1.82 MiB/s, done.
Total 15 (delta 0), reused 0 (delta 0), pack-reused 0
To gitlab.com:sbmagar/helm-chart-demo.git
* [new branch] main -> main
branch 'main' set up to track 'origin/main'.
Now, create this repository we just pushed as a helm chart so that we can store this in the GitLab package registry.
To do so, you can use either the local command terminal or GitLab CI that GitLab provides. But using GitLab CI for packaging and pushing your Helm Charts instead of the command line of your computer is recommended.
Yep, Let’s create GitLab CI pipeline:
Creating GitLab CI pipeline
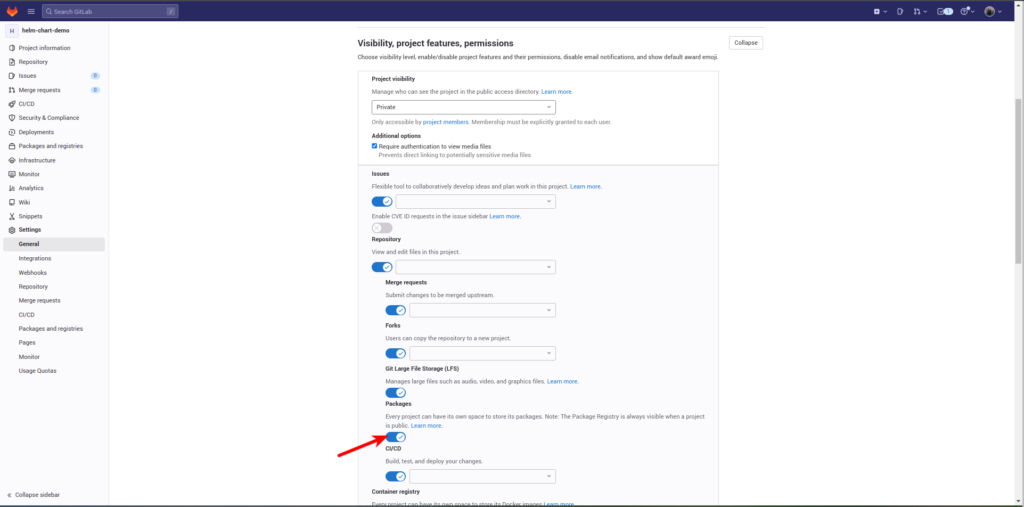
First, enable the Packages button from Settings>General>Visibility, project features, permissions:
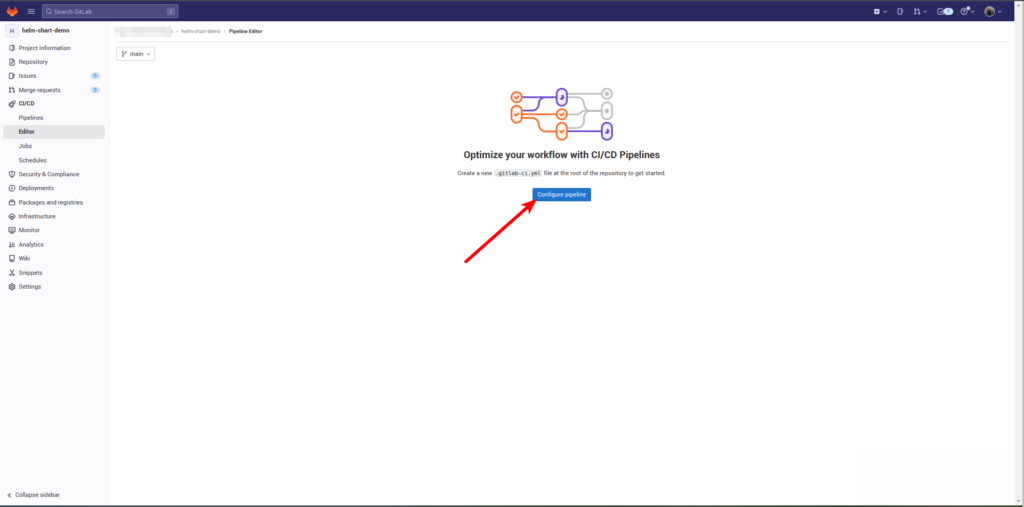
You can configure GitLab CI configuration from CI/CD>Editor>Configure pipeline (or you can manually create .gitlab-ci.yml file and configure yourself locally and then push it to the repository.):
Now, replace the content of .gitlab-ci.yml file with the following:
stages:
  - helm-chart-publish

helm-package-publish:
  stage: helm-chart-publish
  image:
    name: alpine/helm:3.10.1
    entrypoint: [""]
  tags:
    - kubernetes
  variables:
    CHART: demo-chart
  before_script:
    - apk add git
    - helm plugin install --version=v0.10.3 <https://github.com/chartmuseum/helm-push.git>
    - >
      helm repo add ${CHART}
      --username ${CI_REGISTRY_USER}
      --password ${CI_REGISTRY_PASSWORD}
      ${CI_API_V4_URL}/projects/${CI_PROJECT_ID}/packages/helm/stable
  script:
    - helm package ${CHART}
    - helm cm-push ${CHART}*.tgz ${CHART}
  only:
    refs:
      - main
    changes:
      - demo-chart/**/*
Here,
Let’s understand one by one:
stages:
  - helm-chart-publish
This is a stage name called helm-chart-publish ****************which will be used in the helm-package-publish job.
helm-package-publish:
  stage: helm-chart-publish
  image:
    name: alpine/helm:3.10.1
    entrypoint: [""]
  tags:
    - kubernetes
  variables:
    CHART: demo-chart
In this, a job helm-package-publish is defined with a container image and variables required for our demo project. Variable is just for simplifying our code, as it will be used multiple times. And, tags keyword is for gitlab-runners. In my case, I’m using a self-hosted gitlab-runner with the tag name kubernetes.
Note: you have to use other tags according to your gitlab-runner set-up.
before_script:
  - apk add git
  - helm plugin install --version=v0.10.3 <https://github.com/chartmuseum/helm-push.git>
  - >
    helm repo add ${CHART}
    --username ${CI_REGISTRY_USER}
    --password ${CI_REGISTRY_PASSWORD}
    ${CI_API_V4_URL}/projects/${CI_PROJECT_ID}/packages/helm/stable
Here, in this before_script section, we install some dependencies like git (which will be inside of our container image) and helm-push plugin by chartmuseaum. And also the helm repo add command that will add the Helm repository in the shell of our gitlab-runner so that we can authenticate it from the runner.
The CI_REGISTRY_USER, CI_REGISTRY_PASSWORD, CI_API_V4_URL and CI_PROJECT_ID variables are predefined GitLab’s CI/CD specific variables.
CI_REGISTRY_USER— This is the username to push containers/charts to the project’s GitLab container/package registry. Only available if the container/package registry is enabled for the project.CI_REGISTRY_PASSWORD— This is the password to push containers/helm-charts to the project’s GitLab container/package registry. Only available if the container/package registry is enabled for the project.CI_API_V4_URL— The GitLab API v4 root URL.CI_PROJECT_ID— The ID of the current project. This ID is unique across all projects on the GitLab instance.
You can check here for the predefined variables for GitLab CI/CD.
script:
  - helm package ${CHART}
  - helm cm-push ${CHART}*.tgz ${CHART}
In this script section, we’ll create a Helm package and push it to the GitLab package registry. The helm package command packages a chart into a versioned chart archive file, and the helm cm-push command uploads a chart to a registry.
only:
  refs:
    - main
  changes:
    - demo-chart/**/*
Finally, the GitLab job’s triggered. If a commit is made to the main branch, the job will be created because of the only.refs keyword. When the only.changes keyword is used, a job is created and launched whenever any files in the demo-chart directory are changed.
Running the CI pipeline
We created our CI pipeline configuration file, now it’s time to run our pipeline. To trigger this, let’s make some changes in any file of our demo-chart directory. For this let’s change version in Chart.yaml file:
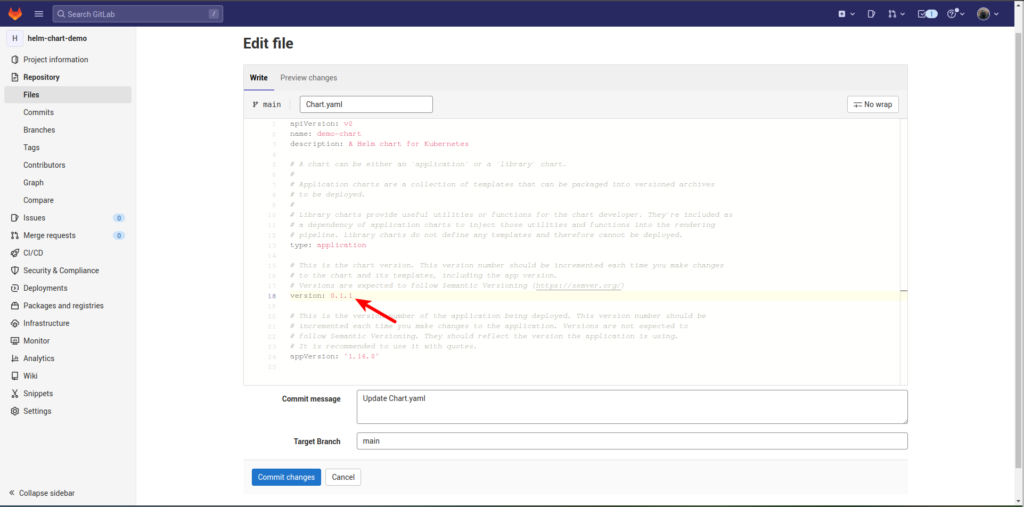
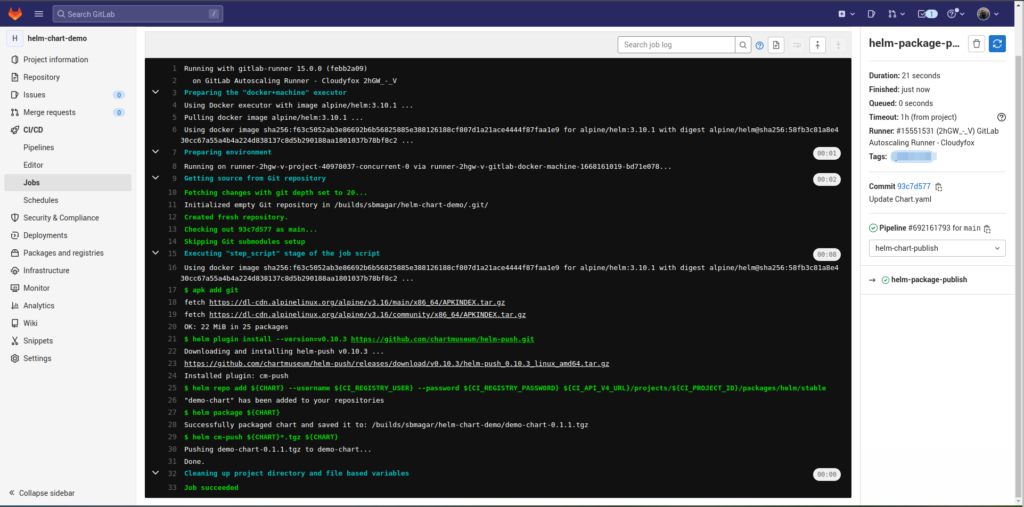
Commit the changes and go to CI/CD, to see the job status.
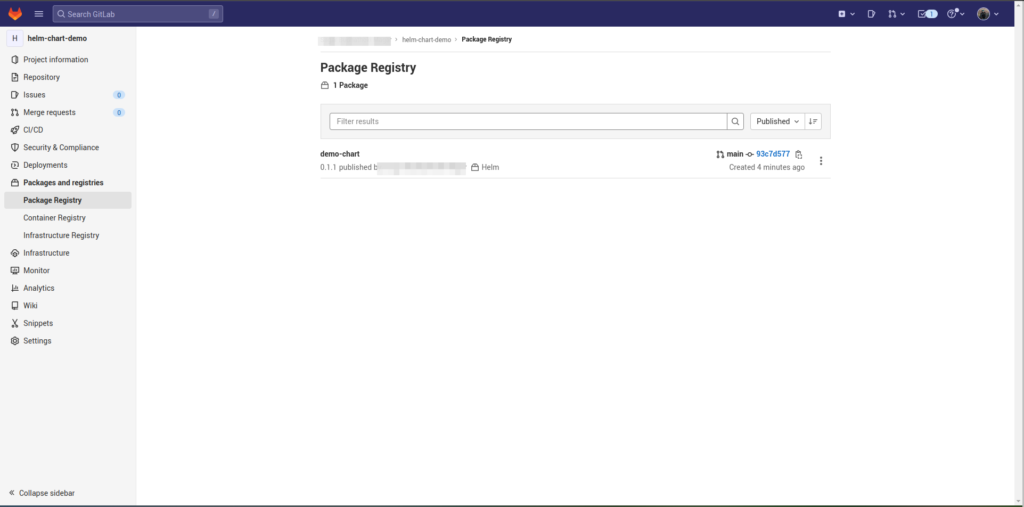
And finally, check the Helm package in the GitLab registry from Packages and registries > Package Registry:
That’s it!!
Conclusion
In this article, you learned to create a Helm chart and store it in the GitLab registry as a Helm chart repository. i.e. you learned how to use GitLab as Helm chart registry, so that you can store, share, and use Helm charts.
Happy Helming!
You can also check out another article on how to set up Kubernete and minikube locally.
Thank you!