

AWS CloudFront is a content delivery network(CDN) service that delivers web content using different global edge locations. In this tutorial, we’ll create the AWS Cloudfront CDN, request a certificate, and validate it using Terraform IaC.
So, let’s dive into configuring CloudFront CDN with certificate using terraform:
PREREQUISITES:
- Terraform installed (For this tutorial I’ll be using Terraform V1.1.6)
- Domain name registered in Route53
- Exported AWS account programmatic credentials as environment variables (AWS_ACCESS_KEY_ID and AWS_SECRET_ACCESS_KEY)
How To Configure AWS CloudFront CDN With Certificate Using Terraform:
Step-1: Create S3 Bucket
In the first step, let’s create an S3 bucket that will be used as an origin in CloudFront distributions. In which all the files and assets will be stored. OR if you have already set up a bucket, you can use the bucket name directly in your configuration.
cloudfront_s3.tf:
resource "aws_s3_bucket" "product_bucket" {
  bucket = "${var.bucket_name}"
  acl = "public-read"
  policy = <<POLICY
{
  "Version":"2012-10-17",
  "Statement":[{
    "Sid":"PublicReadForGetBucketObjects",
      "Effect":"Allow",
      "Principal": "*",
      "Action":"s3:GetObject",
      "Resource":["arn:aws:s3:::${var.bucket_name}/*"
      ]
    }
  ]
}
POLICY
}
Step-2: Certificate for CloudFront Distribution
In this part, we’re going to create a certificate for CNAME used in our CloudFront distribution. For this, make sure you have a custom domain configured.
To create a certificate for CloudFront, you have to request or import the certificate in the us-east-1 region(as mentioned here). But you can use any region if you’re using load balancer as your CloudFront origin.
Since I’m using a different region than us-east-1 for CloudFront distribution, I’ll be using the alias method to validate and create resources in a different region.
Requesting Certificate:
cloudfront_certificate.tf:
provider "aws" {
  alias   = "us_east"
  region  = "us-east-1"
#   profile = var.profile  # if you're using profile for aws credentials
}

resource "aws_acm_certificate" "cloudfront_cdn" {
  provider  = aws.us_east
  domain_name = "*.cdn.${var.domain_name}"
  validation_method = "DNS"

  tags = {
      name = "certificate for cloudfront distribution"
  }

  lifecycle {
    create_before_destroy = true
  }
}
Validating Certificate:
For this tutorial, we’re going to create a certificate, validate it using DNS because DNS validation is faster and simpler. And also add records into the Route53 hosted zone.
When you request the certificate, ACM returns a CNAME for you to insert in your hosted zone. Then, it pings that domain and verifies that the value it returns matches what it expects. CNAME has an array of domain_validation_options with four fields:
- domain (domain name)
- resourse_record_name (DNS record name)
- resourse_record_type (type of record: “CNAME”)
- resourse_record_value (the value that CNAME points to)
Then, validate certificate using aws_acm_certificate_validation specifying certificate’s ARN and CNAME record’s fully qualified domain name(fqdn):
in cloudfront_certificate.tf:
data "aws_route53_zone" "zone" {
  name         = var.domain_name
  private_zone = false
}

# DNS validation
resource "aws_route53_record" "record_validation" {
  zone_id = data.aws_route53_zone.zone.id
  name    = tolist(aws_acm_certificate.cloudfront_cdn.domain_validation_options)[0].resource_record_name
  type    = tolist(aws_acm_certificate.cloudfront_cdn.domain_validation_options)[0].resource_record_type
  records = [tolist(aws_acm_certificate.cloudfront_cdn.domain_validation_options)[0].resource_record_value]
  ttl     = var.ttl
  allow_overwrite = true
}

# Certificate validation
resource "aws_acm_certificate_validation" "certificate_validation" {
  provider                = aws.us_east
  certificate_arn         = aws_acm_certificate.cloudfront_cdn.arn
  validation_record_fqdns = [aws_route53_record.record_validation.fqdn]
}
Add A record to route53 hosted zone:
In cloudfront_certificate.tf:
resource "aws_route53_record" "a_record" {
    zone_id = var.hosted_zone_id
    name  = "${var.route53_record_name}.${var.domain_name}"
    type  = "A"

    alias {
        name = aws_cloudfront_distribution.product_s3_distribution.domain_name
        zone_id = var.alias_zone_id
        evaluate_target_health = false
    }

    depends_on = [
      aws_cloudfront_distribution.product_s3_distribution
    ]
}
Also Read :
Step-3: CloudFront Distribution Set Up
Now, set up the bucket we just created as the origin in CloudFront distribution.
main.tf:
# Add product cloudfront distribution
resource "aws_cloudfront_distribution" "product_s3_distribution" {
  origin {
    domain_name = "${var.bucket_name}.s3.amazonaws.com"
    origin_id   = var.bucket_name
  }

  enabled             = true   # enable CloudFront distribution
  is_ipv6_enabled     = true
  comment             = "CloudFront distribution for staging"

  aliases = ["${var.route53_record_name}.${var.domain_name}"]
  default_cache_behavior {
		# HTTPS requests we permit the distribution to serve
    allowed_methods  = ["DELETE", "GET", "HEAD", "OPTIONS", "PATCH", "POST", "PUT"]
    cached_methods   = ["GET", "HEAD"]
    target_origin_id = var.bucket_name

    forwarded_values {
      query_string = false

      cookies {
        forward = "none"
      }
    }

    viewer_protocol_policy = "allow-all"
    min_ttl                = 0        # min time for objects to live in the distribution cache
    default_ttl            = 3600     # default time for objects to live in the distribution cache
    max_ttl                = 86400    # max time for objects to live in the distribution cache
  }

  restrictions {
    geo_restriction {
        restriction_type = "none"
    }
  }

  viewer_certificate {
    # cloudfront_default_certificate = true   # use this if you don't have certificate
    acm_certificate_arn = aws_acm_certificate.cloudfront_cdn.arn
    ssl_support_method = "sni-only"
  }

  depends_on = [aws_acm_certificate.cloudfront_cdn]
}
All required variables:
variables.tf:
variable "bucket_name" {
    default = "example-product-media-bucket"
}

variable "hosted_zone_id" {
    type    = string
    default = "Z089411011X86LT4AC" # import from route53 hosted zone
}

variable "hosted_zone" {
    type = string
    default = "example.com"
}

variable "domain_name" {
    description = "Domain name for staging"
    default = "example.com"
}

variable "route53_record_name" {
    description = "Record name for cloudfront distribution"
    default = "dev.cdn" # dev.cdn, <app_name>.cdn, etc.
}

variable "alias_zone_id" {Conclusion
    description = "Hardcoded zonde_id for all cloudfront distribution"
    default = "Z2FDTNDATAQYW2" # FIXED VALUE
}

variable "ttl" {
    default = 60
}
Note: Here alias_zone_id is a hardcoded constant as it’s a fixed constant used for all CloudFront distributions.
Now run plan command and apply changes:
terraform plan
terraform apply
Step-4: Testing
You can test the performance, for this you can use a free online tool: tool.keycdn.com/performance:
Without CDN:

Here, for an object in S3 bucket, it took 1.24 seconds to receive its first byte in Bangalore India from the server(eu-central-1).
With CDN:
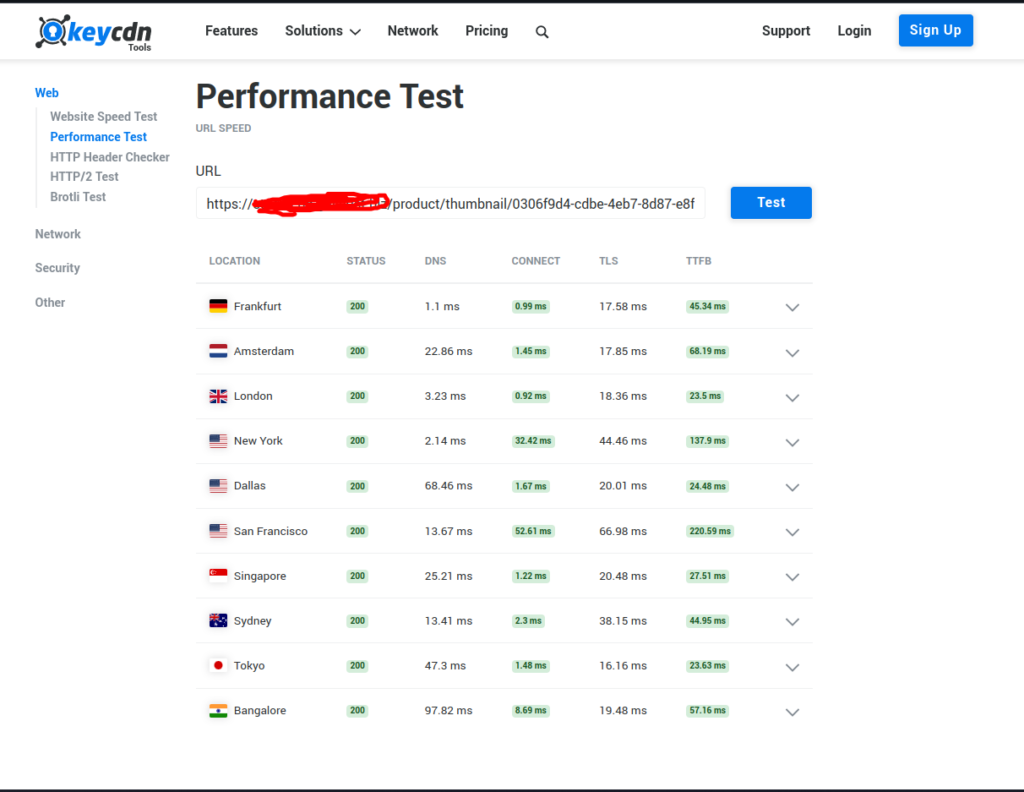
When using CloudFront distribution, it took just 57.16 milliseconds to receive its first byte in Bangalore India from the server(frankfurt eu-central-1).
That’s all!
Conclusion
In this article, we covered the AWS CloudFront CDN With Certificate Using Terraform. And also tested with free online tool.
Also, check out my article on how to deploy static website on s3. And you can set that s3 as an origin for CloudFront to serve your static website.
Similar article; ElasticSearch on AWS EC2 using Terraform
Also read my article on AWS-CDK: How To Set Up AWS CDK With Python
Thank you!