
Nowadays, hiding identity, remotely accessing the company or server, Inside IoT security, etc are the challenges we face each day. We can use OpenVPN as an SSH whitelisting so we can access/ssh the servers or instances only when we’re connected to the VPN.
Create an account if you haven’t already, OpenVPN is not completely free. You can use free tier with 2 free connections.
To set up OpenVPN access server on AWS EC2 (self-hosted), we can use different types of Linux machines such as Ubuntu, CentOS, Amazon Linux etc. For this tutorial, I’m going to use AWS Marketplace AMIs(pre-baked AMIs). Even though the instance is pre-baked, setting up OpenVPN might be a little tricky. So. I’m going to cover those step by step.
How to configure OpenVPN Access Server on AWS EC2 (Self-Hosted)
1. Creating Instance with AWS Marketplace (AMIs):
- Go to your console and select the region you want your OpenVPN instance to be in.
- Select EC2 service and search OpenVPN to launch a new instance from AWS Marketplace. It will show official OpenVPN Access Server AMIs from AWS Marketplace.
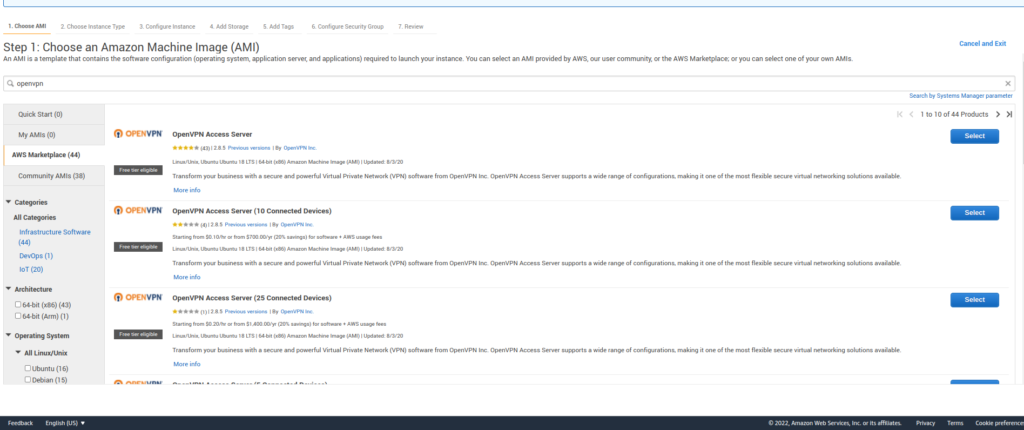
- Now select one of the OpenVPN Access Servers from the list. For this, I’m going to select the first one with t2.micro instance type.
- (Important)Configure all of the instance details as per your requirements. During the configuration, make sure you choose your VPC and subnet. If you don’t have custom VPC and subnets, leave all these settings as is. Make sure that OpenVPN server instance is in public subnet so it is accessible via the web directly.
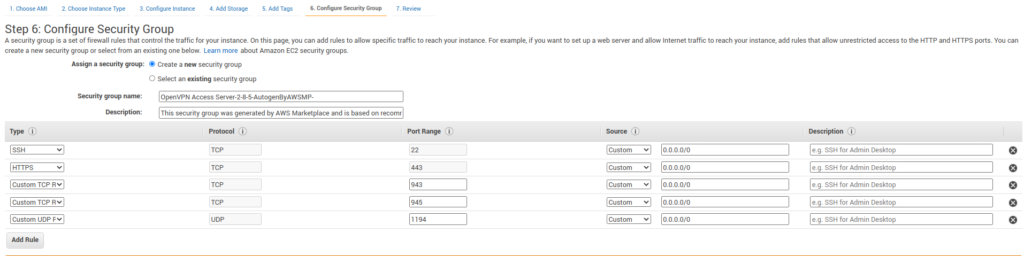
- Create a security group for the OpenVPN Server in which save rules AWS already has filled.
- Now review and launch the instance. It will run a new instance.
2. IP and Domain:
When the instance is up and running, AWS provides public IP automatically. But it will immediately change when you reboot the instance anytime. For this, we can associate an elastic IP to the instance so it stays the same even if the instance is stopped or rebooted.
- Go to Elastic IPs section and Allocate a new address.
- Now you have new elastic IP but not associated with any instance. Associate address selecting your openVPN instance.
- Save, and you have now elastic IP. Now, you can associate a domain to this public IP.
If you want to use a custom domain, make sure you have a domain like vpn.yourdomain.com (or similar as you wish) to access this server(instance).
Point your A record of domain to the elastic IP.
3. Setup OpenVPN:
You will not be able to access openVPN server directly as you haven’t set up server. For this you have to ssh into the server:
- Use key-pair file vpn-keypair.pem (created when launching instance) to ssh into the instance. Open port 22 for all traffic to be able to SSH into the instance. (we can change that later after setup)
- Use username as openvpnas as this is the default with OpenVPN marketplace instance.
- Once you log in, follow the setup wizard. It will ask no. of settings to you.
openvpnas@ip-address:#

Welcome to OpenVPN Access Server Appliance 2.8.5

  System information as of Sat Feb 11 12:24:42 UTC 2022

  System load:  0.95              Processes:           98
  Usage of /:   26.7% of 7.69GB   Users logged in:     0
  Memory usage: 18%               IP address for eth0: 172.32.1.87
  Swap usage:   0%


          OpenVPN Access Server
          Initial Configuration Tool
------------------------------------------------------


Please enter 'yes' to indicate your agreement [no]: yes

Once you provide a few initial configuration settings,
OpenVPN Access Server can be configured by accessing
its Admin Web UI using your Web browser.

Will this be the primary Access Server node?
(enter 'no' to configure as a backup or standby node)
> Press ENTER for default [yes]: yes

Please specify the network interface and IP address to be
used by the Admin Web UI:
(1) all interfaces: 0.0.0.0
(2) eth0: 172.31.16.206
Please enter the option number from the list above (1-2).
> Press Enter for default [2]: 1

Please specify the port number for the Admin Web UI.
> Press ENTER for default [943]: 943

Please specify the TCP port number for the OpenVPN Daemon
> Press ENTER for default [443]: 443

Should client traffic be routed by default through the VPN?
> Press ENTER for default [yes]: yes

Should client DNS traffic be routed by default through the VPN?
> Press ENTER for default [yes]: yes

Use local authentication via internal DB?
> Press ENTER for default [yes]: yes

Private subnets detected: ['172.31.0.0/16']

Should private subnets be accessible to clients by default?
> Press ENTER for EC2 default [yes]: yes

To initially login to the Admin Web UI, you must use a
username and password that successfully authenticates you
with the host UNIX system (you can later modify the settings
so that RADIUS or LDAP is used for authentication instead).

You can login to the Admin Web UI as "openvpn" or specify
a different user account to use for this purpose.

Do you wish to login to the Admin UI as "openvpn"?
> Press ENTER for default [yes]: yes

> Please specify your OpenVPN-AS license key (or leave blank to specify later):

Initializing OpenVPN...
Adding new user login...
useradd -s /sbin/nologin "openvpn"
Writing as configuration file...
Perform sa init...
Wiping any previous userdb...
Creating default profile...
Modifying default profile...
Adding new user to userdb...
Modifying new user as superuser in userdb...
Getting hostname...
Hostname: openvpnserver
Preparing web certificates...
Getting web user account...
Adding web group account...
Adding web group...
Adjusting license directory ownership...
Initializing confdb...
Generating init scripts...
Generating PAM config...
Generating init scripts auto command...
Starting openvpnas...

NOTE: Your system clock must be correct for OpenVPN Access Server
to perform correctly.  Please ensure that your time and date
are correct on this system.

Initial Configuration Complete!

You can now continue configuring OpenVPN Access Server by
directing your Web browser to this URL:

https://ip-address:943/admin
Login as "openvpn" with the same password used to authenticate
to this UNIX host.

During normal operation, OpenVPN AS can be accessed via these URLs:
Admin  UI: https://ip-address:943/admin
Client UI: https://ip-address:943/

See the Release Notes for this release at:
https://openvpn.net/vpn-server-resources/release-notes/- Now create password to login first time as an admin, for that:
openvpnas@ip-address:~$ sudo passwd openvpn
Enter new UNIX password:
Retype new UNIX password:
passwd: password updated successfully
4. OpenVPN UI:
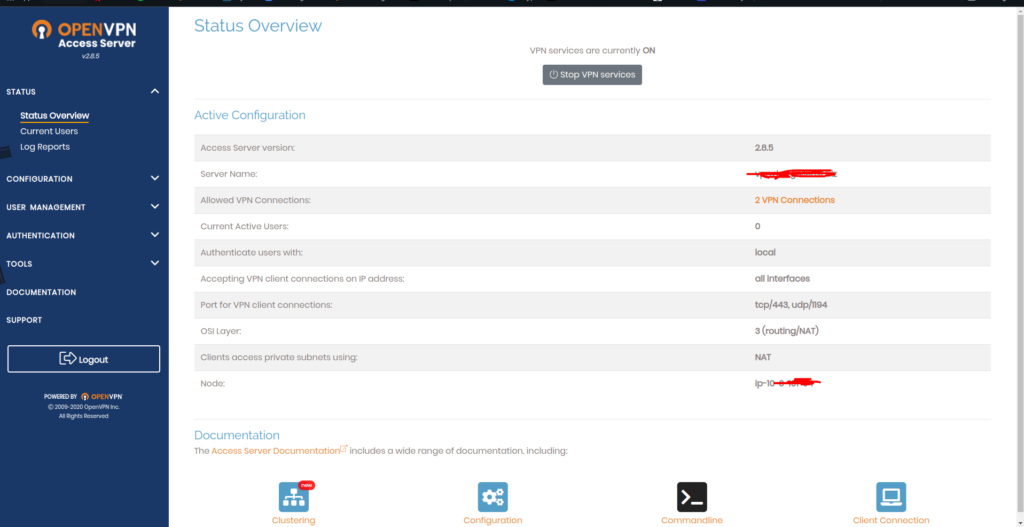
From browser visit https://<elastic-IP>:943/admin, you will get openVPN server UI. And login with the username OpenVPN (created before) and the admin password set earlier. Once you login, accept the terms & conditions.
- From Configuration > Network Settings:
- Change Hostname or IP Address to vpn.yourdomain.com and click save settings.
- Now click on Update running server.

And you have successfully set up a custom domain. Visit https://vpn.yourdomain.com:943/admin it should work perfectly!
5. SSL Set-up:
As there is no SSL configured your server is not trusted by browsers. In this section, we’re going to use Certbot to install SSL certificate. For this:
- SSH to your VPN server and type the following commands:
sudo apt-get update
sudo apt-get install software-properties-common
sudo add-apt-repository universe
sudo add-apt-repository ppa:certbot/certbot
sudo apt-get update
sudo apt-get install -y certbot
To install Certbot, open port 80 temporarily on the security group of your OpenVPN server (Certbot will verify the server and domain).
- Go to AWS console, choose openVPN security group > inbound rules and add HTTP 80 rule with source 0.0.0.0/0 to access port 80 traffic.
- SSH into openVPN server again and type the following command:
sudo certbot certonly --standaloneFollow no. of questions with answering them and use domain as vpn.yourdomain.com. It will verify using port 80.
openvpnas@ip-address:~$ sudo certbot certonly --standalone
Saving debug log to /var/log/letsencrypt/letsencrypt.log
Plugins selected: Authenticator standalone, Installer None
Enter email address (used for urgent renewal and security notices) (Enter 'c' to
cancel): support@yourdomain.com

- - - - - - - - - - - - - - - - - - - - - - - - - - - - - - - - - - - - - - - -
Please read the Terms of Service at
https://letsencrypt.org/documents/LE-SA-v1.2-November-15-2017.pdf. You must
agree in order to register with the ACME server at
https://acme-v02.api.letsencrypt.org/directory
- - - - - - - - - - - - - - - - - - - - - - - - - - - - - - - - - - - - - - - -
(A)gree/(C)ancel: A

- - - - - - - - - - - - - - - - - - - - - - - - - - - - - - - - - - - - - - - -
Would you be willing to share your email address with the Electronic Frontier
Foundation, a founding partner of the Let's Encrypt project and the non-profit
organization that develops Certbot? We'd like to send you email about our work
encrypting the web, EFF news, campaigns, and ways to support digital freedom.
- - - - - - - - - - - - - - - - - - - - - - - - - - - - - - - - - - - - - - - -
(Y)es/(N)o: N
Please enter in your domain name(s) (comma and/or space separated)  (Enter 'c'
to cancel): vpn.yourdoman.com
Obtaining a new certificate
Performing the following challenges:
http-01 challenge for vpn.yourdoman.com
Waiting for verification...
Cleaning up challenges

IMPORTANT NOTES:
 - Congratulations! Your certificate and chain have been saved at:
   /etc/letsencrypt/live/vpn.youdomain.com/fullchain.pem
   Your key file has been saved at:
   /etc/letsencrypt/live/vpn.youdomain.com/privkey.pem
   Your cert will expire on 2022-04-14. To obtain a new or tweaked
   version of this certificate in the future, simply run certbot
   again. To non-interactively renew *all* of your certificates, run
   "certbot renew"
 - If you like Certbot, please consider supporting our work by:
After this, you can remove HTTP port 80 rule as you don’t need it anymore.
Use the following commands to show the text content of 2 files privkey.pem and fullchain.pem, and copy them manually and save them locally with the same filename: (make sure you replace vpn.yourdomain.com with the expected domain or IP)
cat /etc/letsencrypt/live/vpn.youdomain.com/fullchain.pem
cat /etc/letsencrypt/live/vpn.youdomain.com/privkey.pem
6. Configure SSL certificate to OpenVPN server:
- Visit https://vpn.yourdomain.com:943/admin and login with admin credentials used earlier.
- Go to Configuration > Web Server:
- Upload local fullchain.pem for Certificate and local privkey.pem for Private Key. Then click Validate.
- Click on Save and Update existing server.
Here we go, you have successfully set up SSL to your OpenVPN server.
7. Create New User:
Go to VPN admin URL and from User Management panel:
- Go to User Permission, enter new username ‘clientuser’ (you can use any) and click More Settings and set new password.
- Click on Save Settings and Update existing server.
8. Login:
Now, go to the client VPN URL(without /admin)(https://your.domain.com:943/) and log in with the credentials you set up earlier. You can download the client config file also. Or reset password and username from the admin panel.
That’s all! You configured OpenVPN access server on AWS EC2 self-hosted.
Thank you!!