Introduction
What is Docker?
Docker is the most popular and leading software container platform. It is widely used to make the deployment processes easy, efficient, and bug-free. Docker container resolves lots of issues related to the deployment of applications. It gives you a standard way of packaging applications with needed dependencies such as libraries, and other dependencies within a container and deploying it as one package. In simple, Docker is a software platform that simplifies the process of building, running, deploying, managing, and distributing applications by virtualizing the OS.
Docker is especially for developers and sysadmins to build, ship, and run the applications on different platforms either on the cloud or on VMs or on local machines. So, for the DevOps Docker is undoubtedly a must-have skill.
Why Docker?
Without Docker:
Without the use of Docker, if you planned to deploy multiple applications which use multiple versions of language or libraries or dependencies, on a server(physical or VM), It will prevent hosting all applications on the same host machine. As you cannot have multiple versions of languages or libraries or dependencies on the same machine.
To solve such a problem, you have to use either three physical machines or a powerful machine that can host and run three virtual machines on it.
With Docker:
The solution to the problem we have without using docker is expensive, as it costs more including maintenance of hardware. So the best cost-effective and efficient solution is Docker definitely. Let’s see how can it simplifies our problem.
First, let’s take a look at how Docker works:
Let’s say, you have three different applications with respective dependencies and libraries. And you plan to deploy an application on Docker host. Then the docker host creates a logical entity(docker container) on it which creates an environment to host that application, with a virtual copy of the process table, network interfaces, other file systems, etc. And this is inherited from OS on which the container is hosted and running.
(Note: Docker Container does not have any OS installed or running on it.)
This makes each container isolated from the other on the same host. And you can run multiple applications with their respective requirements and dependencies using multiple containers.
In short, docker virtualizes OS, not hardware components.
Advantages and disadvantages of Docker
Advantages:
- Multiple applications deployment within the same OS requirements.
- Optimized storage. The container consumes very little space and memory.
- Reduces the cost when it comes to the hardware required to run the application.
Disadvantages:
- Applications with different OS requirements cannot be hosted together.
Docker Engine
It is the core component of Docker. It consists of 3 main components: Server, REST API and Client
- Server
The server runs daemon, dockerd(Docker Daemon), which is a process. It’s responsible for creating and managing Docker images, containers, networks, and volumes.
- REST API
How can the application interact with the server is done by REST API. It instructs all the applications.
- Client
It’s a command-line interface, which allows interaction with docker using commands.
Docker Image and Docker Containers
Docker Image is a template that contains the application with all the dependencies and required libraries t run that application on the Docker host.
Docker Container is a logical entry, is an environment with network interfaces, process tables, file systems, etc.
Docker Hub is the official repository where you can find all the Docker Images that are available to use. It also allows us to store our custom images. Also, we can make it public or private.
Docker Installation
Now, after a short introduction to the Docker. Let’s get our hands dirty with the Docker installation.
To install docker on your system, you can follow the official docker installation guides:
Linux:
MacOS:
Windows:
Docker Commands
After the successful installation of docker, let’s dive into some docker commands.
- docker create
This command allows us to create a new container.
$ docker create [options] IMAGE [commands] [arguments]Note: here anything enclosed with square brackets is optional.
e.g.
$ docker create ubuntuHere, this creates a new container using the latest ubuntu image.
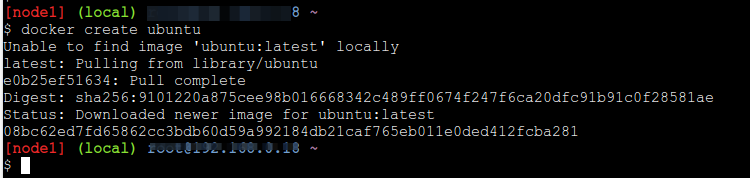
First, it checks if ubuntu’s latest image is available on the host machine or not. If not found, it will download from the Docker Hub. On successful creation, it returns the container ID. Each container has a unique container ID. We can perform various operations on the container using its ID.
let’s see another example with other options used:
$ docker create -t -i ubuntu bashIt creates the container in the same manner mentioned above. Here, -t and -i instructs docker to allocate terminal to the container and interact with the container.
- docker ps
This command is used to view all the containers that are running.
$ docker ps
If you want the display all the containers that were created but are either running or not running, you can use -a option.
$ docker ps -a- docker start
It is used to start a container by its container ID(or a few unique characters) or by specifying the container name.
$ docker start c118dc
# or
$ docker start zen_lichterman- docker stop
It stops the running container(s).
$ docker stop [options] CONTAINER ID/NAME [CONTAINER ID/NAME…]e.g.
$ docker stop c118dc
# or
$ docker stop zen_lichterman- docker restart
It is used to restart the running container.
$ docker restart [options] CONTAINER_ID/CONTAINER_NAME [CONTAINER_ID/CONTAINER_NAME]e.g.
$ docker restart c118dc
# or
$ docker restart zen_lichterman- docker run
This creates the container and starts. (combination of docker create and docker start)
$ docker run [options] IMAGE [commands] [arguments]e.g.
$ docker run ubuntuYou can run the container in interactive mode also by specifying -it.
$ docker run -it ubuntuTo exit from the interactive terminal, type exit.
- docker rm
It deletes the container.
$ docker rm [options] CONTAINER_ID/CONTAINER_NAME [CONTAINER_ID/CONTAINER_NAME]e.g.
$ docker rm c118dc
# or
$ docker rm zen_lichterman- docker images
This command lists all the docker images.
$ docker images- docker rmi
$ docker rmi [options] IMAGE_ID/IMAGE_NAME [IMAGE_ID/IMAGE_NAME]e.g.
$ docker rmi ubuntumultiple image deletion:
$ docker rmi ubuntu alpine node mongo-expressby ID:
$ docker rmi e614f24b4577 c059bfaa849c 211bb86587c9 2d2fb2cabc8f:latest- docker exec
It is used to run a new command in a running container.
$ docker exec [OPTIONS] CONTAINER_ID/CONTANER_NAME COMMAND [ARG...]e.g.
$ docker exec -d ubuntu touch /tmp/execWorksThis creates a new file /tmp/execWorks inside the running container ubuntu, in the background.
$ docker exec -it ubuntu /bin/shThis runs a new bash session on the running container, ubuntu.
Creating First Dockerfile
To build an application, we need to use a Dockerfile. It is simply a text-based script of instructions that is used to create a container image. And this file has no extension like .txt
For this section, let’s create a Dockerfile in a project directory.
# Dockerfile
FROM node:12-alpine
RUN apk add --no-cache python2 g++ make
WORKDIR /app
COPY . .
RUN yarn install --production
CMD ["node", "src/index.js"]
EXPOSE 3000
Now build the image using the docker build command.
$ docker build -t first-project .Here, -t is used to tag the image and . tells that docker should look for the Dockerfile in the current working directory.
Now, start the app container
$ docker run -dp 3000:3000 first-projecthere -d is used to run the container in detached mode i.e in the background. and -p is used to map the port 3000 to the container’s 3000 port.
And go to http://localhost:3000 . You should see your application.
And there is a lot more to learn about Docker. Keep practicing, keep learning.
Pushing to Docker Hub
First, sign in to docker hub by going Docker Hub, sign up if you haven’t already.
- Create a repository on the welcome page.
- Name it. And make it private or public as you wish.
- Click Create.
You have now a docker hub repository, where you can store your images.
Now, log into the docker hub using the command line:
$ docker login --username=<dockerhub_username> --email=<youremail>Check the image ID and tag your image:
$ docker tag <IMAGE_ID> <dockerhub_username>/first-project:newtagHere, IMAGE_ID must match and:newtag is the tag. The tag is used to identify the image.
At last push the image to your repository created before.
$ docker push <dockerhub_username>/first-projectand here you/we go… you have successfully pushed our image to docker hub making it publicly available for use.