

Today, we’ll talk about how to install and configure Postfix with Gmail SMTP on Ubuntu, so that you can use it to send mail using Gmail. If you’re using a Linux system, you probably heard of Postfix. Postfix is one of the most popular Mail Transfer Agent (MTA) that is used to route and deliver email on a Linux system. Also, it’s open-source and widely used by approx. 33% of internet mail servers.
Prerequisites
Before installing and configuring postfix, you need to have some pre-requirements:
- A Linux server (Ubuntu 20.04 in my case)
- A Google account with two-factor authentication
Google Account Set Up
First, before proceeding to set up Postfix, you need to set up your google account.
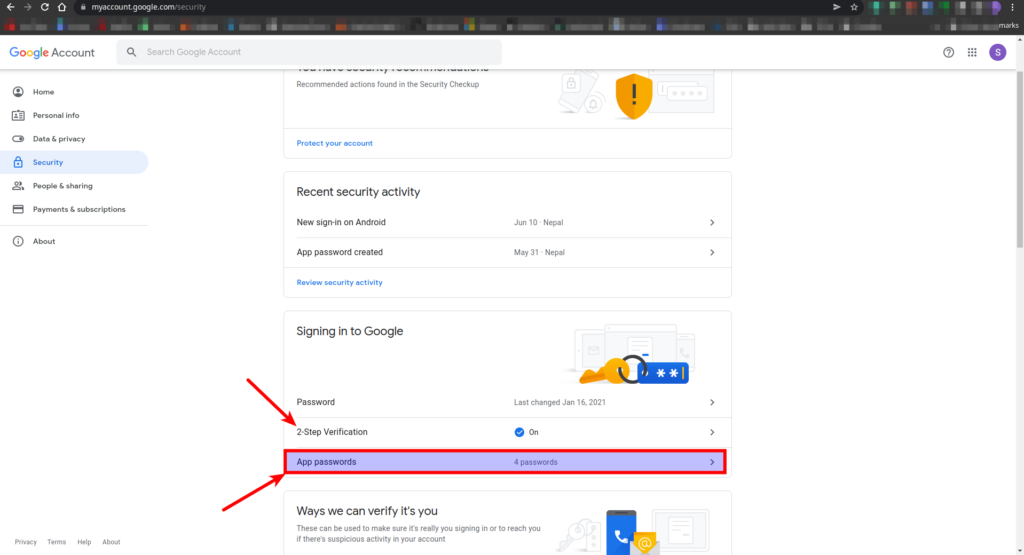
- Open a web browser and log into your google account.
- Navigate to Security from the sidebar menu and scroll down and click on App passwords.
- You have to enable two-factor authentication if you haven’t already.
- Now generate a new password. (Log in with Gmail password if prompted.)

- Save the password for your newly created app. Write it down or save it somewhere secure so that you’ll be able to find it easily in the next steps, then click Done:

Postfix – Installation
Step-1: Postfix and Mailutils installation
Let’s install postfix and mailutils(or mailx for Fedora):
$ sudo apt update
$ sudo apt install postfix mailutils -y
On the prompt screen, select Internet Site as the type of mail server. On the next screen give the system mail name. Use your domain if configured, otherwise use it as a localhost. You can change it later also.


Step-2: Gmail Set Up for Postfix
Once you have successfully installed Postfix, now it’s time to set up Gmail authentication. For security purposes, you need to put the app password created before in the configuration file and lock it down. This is done so that no one can see your app password.
To do so, run the following command:
$ sudo nano /etc/postfix/sasl/sasl_passwdAnd add this line:
[smtp.gmail.com]:587 sagar.exclamation@gmail.com:uhpyqdiozquddfmcSave and exit the file.
Configure Postfix with Gmail SMTP
Step-1: Configure SMTP to Postfix
Till now, you have set up Gmail authentication and installed Postfix and mailutils so far. Now, you have the configuration file /etc/postfix/main.cf for postfix, in which you’ll be writing some extra stuff to make postfix work with Gmail.
- Open
/etc/postfix/main.cffile using the editor of your choice (vim or nano). Modifyrelayhostin/etc/postfix/main.cfto match the following example. Be sure the port number matches what you specified/etc/postfix/sasl_passwdabove:
$ sudo nano /etc/postfix/main.cf- See the following lines, if not add them:
relayhost = [smtp.gmail.com]:587
smtp_use_tls = yes
smtp_sasl_auth_enable = yes
smtp_sasl_security_options =
smtp_sasl_password_maps = hash:/etc/postfix/sasl_passwd
smtp_tls_CAfile = /etc/ssl/certs/ca-certificates.crt- Save and exit the file.
Step-2: Set Up App Password File to Postfix
Feed password file created earlier into Postfix using postmap. Postmap is included in mailutils or mailx utilities.
$ sudo postmap /etc/postfix/sasl/sasl_passwdOn successful execution, it will create a hash db file sasl_passwd.db inside the same directory. Change their permissions so that only the root user can read from or write to the file. Run the following commands to change the ownership and update the permissions for the two files:
sudo chown root:root /etc/postfix/sasl/sasl_passwd /etc/postfix/sasl/sasl_passwd.db
sudo chmod 600 /etc/postfix/sasl/sasl_passwd /etc/postfix/sasl/sasl_passwd.db
Step-3: Restart the Postfix and Test
Now after all configurations are set up, restart the postfix:
$ sudo systemctl restart postfix.serviceTest the mail server:
$ echo "Just a test mail" | mail -s "Test Mail" sagar.exclamation@gmail.comHere, mail is another utility tool installed with mailutils or mailx. You’ll get a test mail in mentioned Gmail account.
OR,
You can test postfix email sending with Gmail using Postfix’s sendmail implementations:
sendmail recipient@elsewhere.com
From: you@example.com
Subject: Test mail
This is a test email
.
Here, . is used to end the process, as there will be no prompt between lines.
You can check the logs by opening syslog:
$ sudo tail -f /var/log/syslogThat’s it!!
Conclusion
In this article, we learned about how to install Postfix and configure it with Gmail SMTP on Ubuntu, so that we can send emails through Gmail and Google Workspace.