

In this article, we will discuss how to internationalize the next app using next-translate. next-translate is a npm package that helps in the translation of the application. It is one of the best libraries to handle the translations in a Next application. next-translate aims to keep the translations as simple as possible in a Next.js environment.
Step 1: Create a Next js Application
npx create-next-app translation-appStep 2: Install next-translate
npm install next-translateStep 3: Setup Next-Translate in the next.config.js File
We need to make some changes in the next.config.js file located in the root directory to initialize the next-translate in the application. We should import next-translate and export it as a module.
const nextTranslate = require('next-translate')

module.exports = nextTranslate()
Or if there already exists a next.config.js file and you want to keep the changes in it, pass the config object to the nextTranslate(). For example:
const nextTranslate = require('next-translate');

module.exports = nextTranslate({
  reactStrictMode: true,
});
Step 4: Create i18n.js Config File
We need to create a i18n.js file at the root repository. Each page should have its namespaces.
{
  "locales": ["en", "es"],      // Array of language codes that you want to use
  "defaultLocale": "en",             // Default language
  "pages": {                               // Paths of the pages with their corresponding namespaces
    "*": ["common"],
    "/": ["home"],
  }
}
Step 5: Create Your Namespaces Files
The namespaces are specified on the locales folder in the root directory. The locales folder contains the sub-folders of languages defined in the i18n.js file and each language folder contains the files with filenames matching the namespaces mentioned in the i18n.js file.
The project directory should look something like this:
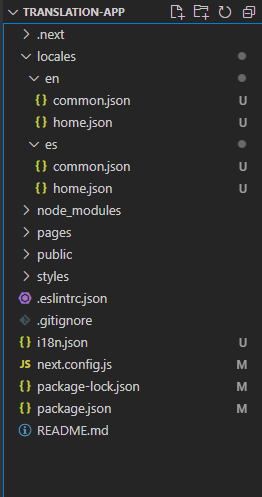
Here, en is for English language and es is for Spanish.
Step 6: Create Translation Texts in Namespaces Files
Now, we need to create the key-value for the translation texts in the namespaces. The key of the texts should be the same for both languages’ namespaces. For example: If the key of “Hello” is “hello” in the common.json of en language then it should also be “hello” for the es language.
Here, we will create some texts in the common.json and home.js in both language folders.
./locales/en/common.json
{
    "hello_world": "Hello World"
}
./locales/es/common.json
{
    "hello_world": "Hola Mundo"
}
./locales/en/home.json
{
    "title": "This is a translation tutorial",
    "language_options": "Language Options:"
}
./locales/es/home.json
{
    "title": "Este es un tutorial de traducción.",
    "language_options": "Opciones de lenguaje:"
}
Step 7: Implement Translation on the Desired Page
As we defined the namespaces with the pages in the i18n.js, we can apply using the useTranslation() function from the next-translate. And we can change the language using the setLanguage() function from the next-translate. We need to pass the language code defined in the locales key of i18n.js file in the setLanguage().In this tutorial, we can pass either en or es.
Edit pages/index.js
import useTranslation from "next-translate/useTranslation";
import setLanguage from "next-translate/setLanguage";

export default function Home() {
  let { t } = useTranslation();

  return (
    <div>
      <h1>{t("common:hello_world")}</h1>
      <h2>{t("home:title")}</h2>
      <span>{t("home:language_options")}</span>
      <br />
      <button onClick={() => setLanguage("en")}>English</button>
      <button onClick={() => setLanguage("es")}>Spanish</button>
    </div>
  );
}
Output
Here, we used two buttons to set the language to English or Spanish using setLanguage() function. useTranslation() is used to display the text of the selected language. We need to pass the namespace value and the text key defined in the namespace file.
Conclusion
In this article, we discussed how to internationalize the Next app using next-translate. We made a Next app with two language options: English and Spanish. When the appropriate language button is clicked, the texts are changed to the selected language. We can follow the next-translate official docs for more details.