

In the previous article, we did a tutorial on micro frontend setup. In this article, we will be discussing the props and state part of the micro frontend.
State is a store that is used to store the value of a component and can be updated over time. In React, we can use useState for state management within a component. Props is an object that helps to pass values from one component to another. We can pass values from one component to another component easily using props but when we need to pass props from a parent component to the nested child component then one method is props drilling which is not a feasible solution and another method is using react-redux.
React-Redux is one of the advanced libraries for state management in React. In this tutorial on props and state of the micro frontend, we will be using React.
Passing Props in Micro Frontend
Step 1: Create a Component in Child Module
First, we create a component that consumes the props values. Here, In a module called state-management, we create a DisplayCount component to display a count value and some buttons to increment, decrement and reset.
import React from "react";

function DisplayCount({ count, increment, decrement, reset }) {
  return (
    <div>
      The Count is: {count}
      <div>
        <button onClick={increment}> + </button>
        <button onClick={decrement}> - </button>
        <button onClick={reset}> reset </button>
      </div>
    </div>
  );
}

export default DisplayCount;
Step 2: Expose this component in webpack.config.js
  plugins: [
    new ModuleFederationPlugin({
      name: "state_management",
      filename: "remoteEntry.js",
      remotes: {},
      exposes: {
        "./DisplayCount":"./src/DisplayCount",

      },
      shared: {
        ...deps,
        react: {
          singleton: true,
          requiredVersion: deps.react,
        },
        "react-dom": {
          singleton: true,
          requiredVersion: deps["react-dom"],
        },
      },
    }),
    new HtmlWebPackPlugin({
      template: "./src/index.html",
    }),
  ],
Step 3: Connect host Module With state-management Module
Connect to state-management remote file from the host by adding it to the webpack.config.js file of the host module.
  plugins: [
    new ModuleFederationPlugin({
      name: "host",
      filename: "remoteEntry.js",
      remotes: [
        {
          state_management: "state_management@http://localhost:8005/remoteEntry.js",
        },
      ],
      exposes: {},
      shared: {
        ...deps,
        react: {
          singleton: true,
          requiredVersion: deps.react,
        },
        "react-dom": {
          singleton: true,
          requiredVersion: deps["react-dom"],
        },
      },
    }),
    new HtmlWebPackPlugin({
      template: "./src/index.html",
    }),
  ],
Step 4: Create a Component in the host Module.
Here, we create a MyCounter component and import the DisplayCount and pass the required props.
import React, { useState } from 'react'
import DisplayCount from 'state_management/DisplayCount';

function MyCounter() {
  const [count, setCount] = useState(0);
  const handleIncrement = () => setCount(count + 1);
  const handleDecrement = () => setCount(count - 1);
  const handleReset = () => setCount(0);

  return (
    <div>
      <DisplayCount
          count={count}
          increment={handleIncrement}
          decrement={handleDecrement}
          reset={handleReset}
          />
    </div>
  )
}

export default MyCounter
Step 5: Import that MyCounter Component to App.js of the host
import React from "react";
import ReactDOM from "react-dom";
import "./index.css";
import MyCounter from "./MyCounter";
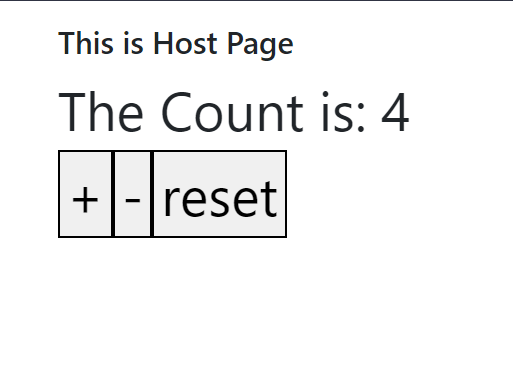
const App = () => (
<div className="container">
<h2> This is Host Page </h2>
<MyCounter/>
</div>
);
ReactDOM.render(<App />, document.getElementById("app"));Output
State Management using React-Redux in Micro Frontend
Here, we will be using the Redux toolkit. It is a package that is intended to be the standard way to write redux logic.
Step 1: Create a Component in Child Module
Here, let us create a counter reducer and actions component named ReduxCounter.js in the state-management module
import { createSlice } from '@reduxjs/toolkit'

const initialState = {
  value: 0,
}

export const counterSlice = createSlice({
  name: 'counter',
  initialState,
  reducers: {
    increment: (state) => {
      state.value += 1
    },
    decrement: (state) => {
      state.value -= 1
    },
    reset: (state) => {
      state.value = 0
    },
  },
})

// Action creators are generated for each case reducer function
export const { increment, decrement, reset } = counterSlice.actions

export default counterSlice.reducer
Step 2: Create store.js File
import { configureStore } from '@reduxjs/toolkit'
import { Provider, useDispatch, useSelector } from 'react-redux'
import counterReducer, { increment , decrement , reset } from './ReduxCounter'
import React from "react";

export const store = configureStore({
  reducer: {
    counter: counterReducer,
  },
})

export function useStore(){
    const count = useSelector(state=>state.counter.value)
    const dispatch = useDispatch();
    return{
        count,
        increment: ()=>dispatch(increment()),
        decrement: ()=>dispatch(decrement()),
        reset: ()=>dispatch(reset()),
    }
}

export function StoreProvider({children}){
    return <Provider store={store}>{children}</Provider>
}
Here, we created a store for counter and a custom hooks useStore that returns count, increment, decrement, and reset. We also created a StoreProvider function that provides the store values to its children.
Step 3: Expose store.js in webpack.config.js
exposes: {
        "./store":"./src/store.js"
      },
Step 4: Add Remote File in host Module’s webpack.config.js
    remotes: [
        {
          state_management: "state_management@http://localhost:8005/remoteEntry.js",
        },
      ],
Step 5: Create a Component in the host Module
import React from 'react'
import {useStore} from 'state_management/store'
import './style.css'


function NewCounter() {
    const {count , increment , decrement , reset} = useStore();
  return (
    <div className='new-counter'>
        <button onClick={increment} className="button">+</button>
        <span>{count}</span>
        <button onClick={decrement} className="button">-</button>
        <button onClick={reset} className="button">reset</button>
    </div>
  )
}

export default NewCounter
Step 6: Import NewCounter Component in host Module’s App.js
import React from "react";
import ReactDOM from "react-dom";
import "./index.css";
import NewCounter from "./NewCounter";
import { StoreProvider } from "state_management/store";
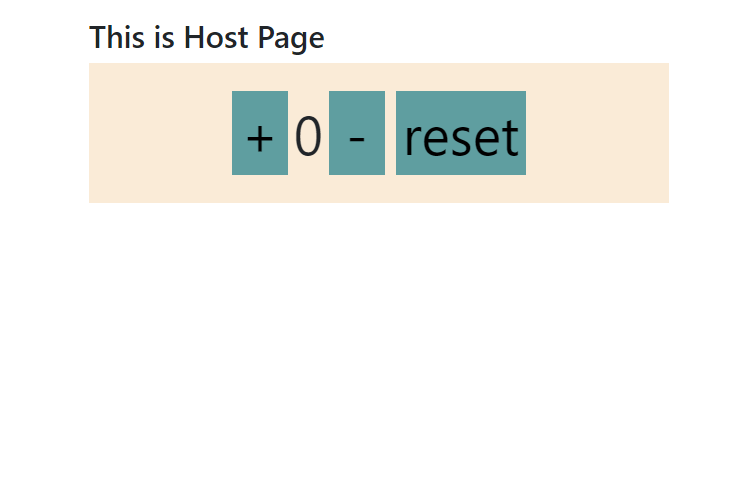
const App = () => (
<div className="container">
<h2> This is Host Page </h2>
<StoreProvider>
<NewCounter />
</StoreProvider>
</div>
);
ReactDOM.render(<App />, document.getElementById("app"));Make sure to wrap the imported redux component with StoreProvider.
Output
Conclusion
In this tutorial, we discussed the state and props in the micro frontend. We did a simple tutorial on passing props between the components of two different modules and state management within the modules using redux.