
Prerequisites
- Basic knowledge of Angular
- Setup of a local development environment. You will need Angular CLI to set up your environment
Introduction
In our previous article, we discussed the difference between template driven forms and reactive forms in Angular. In this article, we will create reactive forms and using validator for validation .
Reactive Forms are created inside a component class, so this is why they are also called model-driven forms. There will be an object within each form control, allowing more control and flexibility in the form programming. Reactive Form are based on structured data models.
Here we will discuss how to use Reactive Form in Angular.
Reactive Form In Angular
Create New Project
Create a new project by running the command below :
ng new angular-reactive-forms-exampleInstall Bootstrap
Install Bootstrap UI framework via NPM using following command.
npm install bootstrapSetting Up Angular Project
Run the below command to generate a brand new Angular project using Angular CLI.
ng new angular-template-driven-formHead over to the Angular form project.
cd angular-template-driven-formInstall Bootstrap in Angular
Install Bootstrap UI framework via NPM using following command.
npm install bootstrapAdd the Bootstrap CSS path in styles array inside the angular.json file.
"styles": [
    "src/styles.css",
    "node_modules/bootstrap/dist/css/bootstrap.min.css"
]
Configure Reactive forms
Open the project in your favourite text editor and Import ReactiveFormsModule in app.module.ts
import { NgModule } from '@angular/core';
import { BrowserModule } from '@angular/platform-browser';

import { AppComponent } from './app.component';
import { ReactiveFormsModule } from '@angular/forms';


@NgModule({
  declarations: [
    AppComponent
  ],
  imports: [
    BrowserModule
  ],
  providers: [ReactiveFormsModule],
  bootstrap: [AppComponent]
})
export class AppModule { }
Define Form Group and Create form
import FormGroup, FormControl & Validator from the @angular/forms app.component.ts file
import { FormGroup, FormControl, Validators } from '@angular/forms'Form Group
We can create form group using syntax below.
profileForm = new FormGroup({})A FormGroup takes 3 arguments: a child FormControl, a validator, and an asynchronous validator
FormControl
FormGroup is the collection of FormControl which be created using syntax below.
profileForm = new FormGroup({
  name: new FormControl(),
  email: new FormControl(),
  country: new FormControl(),
  address: new FormControl(),
  age : new FormControl(),
})
A FormGroup instance has been created and named profileForm. There are five FormControl instances representing the properties name,email,country,address,age.
The other two arguments to FormGroup are Sync Validator & Async Validator. Both are optional.
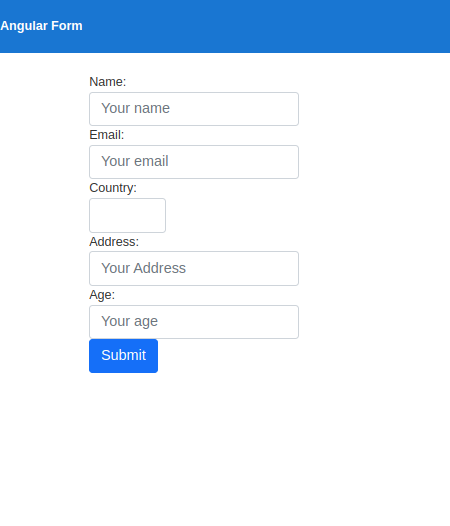
Add code below in app.component.html and app.component.ts file
//app.component.html

<div class="toolbar" role="banner">
  <span>Angular Form</span>
</div>

<div class="content" role="main">
  <div class="container">
    <div class="row">
      <form [formGroup]="profileForm" (ngSubmit)="onSubmit(profileForm)">
        <div class="form-group">
          <label>
            Name:
            <input
              class="form-control"
              formControlName="name"
              placeholder="Your name"
            />
          </label>
        </div>
        <div class="form-group">
          <label>
            Email:
            <input
              class="form-control"
              formControlName="email"
              placeholder="Your email"
            />
          </label>
        </div>
        <div class="form-group">
          <label>
            Country:
            <select class="form-control" formControlName="country">
              <option value="nepal">Nepal</option>
              <option value="india">India</option>
              <option value="usa">USA</option>
              <option value="england">England</option>
              <option value="australia">Australia</option>
            </select>
          </label>
        </div>
        <div class="form-group">
          <label>
            Address:
            <input
              class="form-control"
              formControlName="address"
              placeholder="Your Address"
            />
          </label>
        </div>
        <div class="form-group">
          <label>
            Age:
            <input
              class="form-control"
              formControlName="age"
              placeholder="Your age"
            />
          </label>
        </div>
        <div class="form-group">
          <button class="btn btn-primary btn-block" type="submit">
            Submit
          </button>
        </div>
      </form>
    </div>
  </div>
</div>
//app.component.ts

import { Component, OnInit } from '@angular/core';
import { FormGroup, FormControl, Validators } from '@angular/forms';
@Component({
  selector: 'app-root',
  templateUrl: './app.component.html',
  styleUrls: ['./app.component.css'],
})
export class AppComponent implements OnInit {
  profileForm: any;

  ngOnInit() {
    this.profileForm = new FormGroup({
      name: new FormControl(),
      email: new FormControl(),
      country: new FormControl(),
      address: new FormControl(),
      age: new FormControl(),
    });
  }
  onSubmit(form: FormGroup) {
    console.log('Valid?', form.valid); // true or false
    console.log('Value', form.value);
  }
}
Here we have defined the profileform and added a method for handling form submission
Go to url http://localhost:4200/ and you will see the form
Submit form
Angular’s ngSubmit directive binds itself to the submit button click event in order to submit data to the component. When the user clicks the submit button, ngSubmit invokes the OnSubmit method on the Component class.
When we submit a form with the form filled out, we now can see its value in console.log
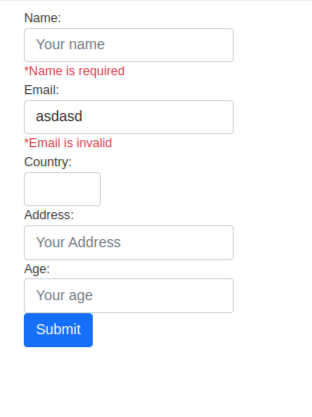
Validator
Validator in Angular is a function which returns null if a control is valid or an error object if it’s invalid.
Update code below inside app.component.ts file
formSubmitted = false;

  ngOnInit() {
    this.profileForm = new FormGroup({
      name: new FormControl("", Validators.required),
      email: new FormControl("", [Validators.required,Validators.email]),
      country: new FormControl(),
      address: new FormControl(),
      age: new FormControl(),
    });
  }
  onSubmit(form: FormGroup) {
    console.log('Valid?', form.valid); // true or false
    console.log('Value', form.value);
    this.formSubmitted = true;
  }
We have added a new variable to track form submission and added required validation for the name and email. The email type validation is also added.
Add div with form-group class for name and email input field inside app.component.html file.
 <div class="form-group">
          <label>
            Name:
            <input
              class="form-control"
              formControlName="name"
              placeholder="Your name"
            />
            <span class="text-danger" *ngIf="formSubmitted && profileForm.get('name').hasError('required')">
              *Name is required
            </span>

          </label>
        </div>

 <div class="form-group">
          <label>
            Email:
            <input
              class="form-control"
              formControlName="email"
              placeholder="Your email"
            />
            <span class="text-danger" *ngIf="formSubmitted && profileForm.get('email').hasError('required')">
              *Email is required
            </span>
            <span class="text-danger" *ngIf="formSubmitted && profileForm.get('email').hasError('email')">
            *Email is invalid
            </span>
          </label>
        </div>
In this example, we’re showing an error message when name and email are empty and email is invalid when the form is submitted.
We can see validation error message below
Conclusion
We have learned how to use reactive forms in angular .
For more details,Please check the official Angular Reactive Form Documentation and source code in Github