

Let’s learn how to perform validation in NestJS. We are going to look at how the request validation is done in the Nest framework.
Introduction
Validation is one of the most important components of a backend service. All the Rest APIs should be validated before the actual function or method runs. It ensures that the correct data is only processed, and it also protects the API from malicious data, coming from the client side.
Validation is necessary as it provides correctness of data that is going to be processed by the web application.
Prerequisites
Validation in NestJS
The Nest framework provides various pipes out of the box, and these are called inbuilt pipes. To use these you need to add additional dependencies, those are two npm modules class-validator and class-transformer.
$ npm install class-validator class-transformer After the package is installed, add the following code in the main.ts files bootstrap function.
//* main.ts

import { ValidationPipe } from '@nestjs/common';

async function bootstrap() {
  // add the following
  app.useGlobalPipes( new ValidationPipe() );
}
Now, that the bootstrapping of the validation pipe is done, let’s look at how pipes are used, in the nest framework.
Pipes
In Nest, pipes operate on arguments which are being processed the rough a controller or the route handler. We use pipes in two cases:
- Transformation: transforms the incoming data into the desired form (i.e. from string to integer )
- Validation: Evaluate incoming data and pass it if it is correct otherwise throw an error
The errors thrown by pipes are handled by the global exception layer. Following are some of the builtin pipes present in NestJS:
ParseIntPipeParseFloatPipeParseBoolPipeParseArrayPipeParseUUIDPipe
We will look ParseIntPipe in the example below.
//# user.controller.ts

import { Controller, Get, Query } from '@nestjs/common';
import { Request, Response } from 'express';
import { UserService } from './user.service';

@Controller('user')
export class UserController {
  constructor(private readonly userService: UserService) {}

  @Get()
  parseIncomingStringValue(@Query('id') id){
    console.log(typeof id);
  }
}

parseIncomingStringValue() method
ParseIntPipeSo, now let’s add ParseIntPipe to the incoming id.
  @Get()
  parseIncommingStringValue(@Query('id', ParseIntPipe) id){
    console.log(typeof id);
  }
ParseIntPipeIf values that cannot be converted to number comes then,

In the above examples, we saw both the validation and transformation properties of nest pipes, most of the pipes provided by the nest framework work in a similar way as the ParseIntPipe, that we looked into.
class-validator
Now that we have looked into inbuilt pipes for validation in NestJS, which also works as a simple validator, let’s look into making a custom validator, which validates the data coming into the body in the client request.
Let’s check custom validation by performing validation on a login function, where email and password is provided by the client. For that first create a class called Login, and add variables email and password.
//* Login.ts

import { IsEmail, IsNotEmpty, Matches } from "class-validator";

export class Login {

  @IsNotEmpty()
  @IsEmail()
  email: string;

  @IsNotEmpty()
  @Matches(/^(?=.*[a-z])(?=.*[A-Z])(?=.*[0-9])(?=.*[!@#\$%\^&\*])(?=.{8,})/, {
    message: 'password too weak',
  })
  password: string;
}
The class-validator provides many validation decorators like @IsNotNull() which makes sure that the variable is not null, and @Matches() matches the data present in the variable with the given pattern. And @IsEmail() checks if the data present in the variable is a valid email or not.
The above pattern is discussed in the article How To Validate Strong Password Using regex In Javascript.
Now let’s implement it in an API route, the following shows the code.
//* app.controller.ts

import { Body, Controller, Get, Post } from '@nestjs/common';
import { AppService } from './app.service';
import { Login } from './Login';

@Controller()
export class AppController {
  constructor(private readonly appService: AppService) {}

  @Post('/login')
  login(@Body() login: Login): string {
    return 'Login successfull';
  }
}
The login class is extended as a Type. So, now let’s test the code out, through postman.

Now, let’s test the code out by sending an invalid email and an invalid pattern password.
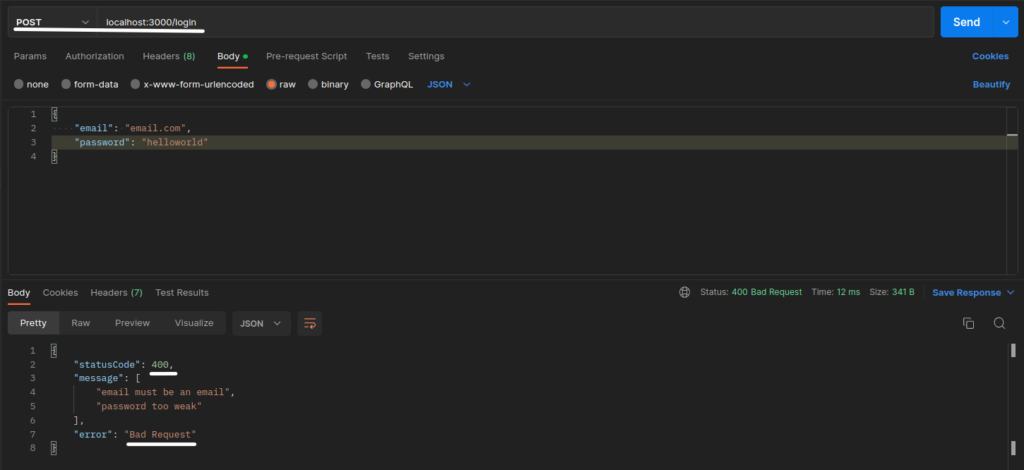
In the error response, we got, the custom validation message in the password section was returned which was kept in the message field in the @Matches() decorator. So, we can see how we performed validation in NestJS using the class-validator package.
The most used decorators provided by the class-validator npm package is listed below.
@IsNotEmpty(): Makes sure the data is not empty@IsNumber(): The data must be a number@IsEmail(): The data must be a valid email address@IsString(): The data must be a string@IsOptional(): The data in the field is optional@IsArray(): The data coming though can only be an array
These were some of the most used validation decorators.
Conclusion
So, in this article, we learned, how to perform validation in NestJS. To learn more about validation in the Nest framework look more into their official docs Validation in NestJS.