Let’s learn how to use guards in NestJS, and also look at how it differs from Middlewares.
Introduction
Guards are used for guarding or protecting an API route. It is used to determine whether a given request will be sent to the route handler or if will it return the response from the guard itself. Guards are used NestJS for authentication, and user role handling. It is used to perform tasks that were done by middleware in the Express framework.
Guards have access to the ExecutionContext instance, which makes it possible for a guard to know what is going to be executed next. The context can be switched to HTTP by using context.switchToHttp() which will provide access to instances of the request, response, and next object, where context is the instance of the ExecutionContext. Guards in NestJS help to keep your code clean, non-repeated, and declarative.

From the above image, we can see that the Guards are executed after all the middleware. The user sent request passes through a middleware if there is any, then travels to the guard, the only route handler is called for execution.
Prerequisites
Guards in NestJS
We have looked at, what Guards in NestJS is now let’s look at how it is made and how it is applied globally and in a single route.
Firstly create a nest project.
## Generating a nest project
$ nest new nest-guard

## for package manager select according to your choice
## article uses: npm
After your NestJS project is created, open it with your favorite code editor. Now that the project is set up let’s move on to the actual part of creating the guard. the guard can simply be created by using the nest CLI.
$ nest g guard app --no-spec The --no-spec option makes sure that the test classes are not generated.


Now, let’s edit the guard and make it so that the API has the id as the query parameter and it has the id of 1 i.e. localhost:3000?id=1, then only it is able to access the required route. Let us look at that in actual code.
//* app.guard.ts

import { CanActivate, ExecutionContext, Injectable, UnauthorizedException } from '@nestjs/common';
import { Observable } from 'rxjs';

@Injectable()
export class AppGuard implements CanActivate {
  canActivate(
    context: ExecutionContext,
  ): boolean | Promise<boolean> | Observable<boolean> {
    const request = context.switchToHttp().getRequest();
    const id = request.query.id;
    if(id === '1') {
      return true;
    }

    throw new UnauthorizedException();
  }
}
The above code will move on to the route handler if the request has id = 1 in the query parameter.
Now, let us apply the guard in a single route handler which is present in the controllers.
//* app.controller.ts

import { Controller, Get, UseGuards } from '@nestjs/common';
import { AppGuard } from './app.guard';

@Controller()
export class AppController {

  @Get()
  @UseGuards(AppGuard)
  getHello(): string {
    return `Hello World!`;
  }

  @Get('/bye')
  getBye(): string {
    return `Bye!`;
  }
}
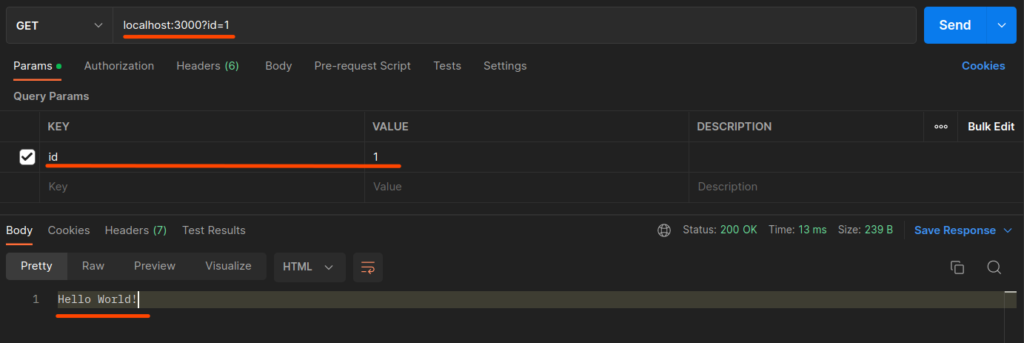
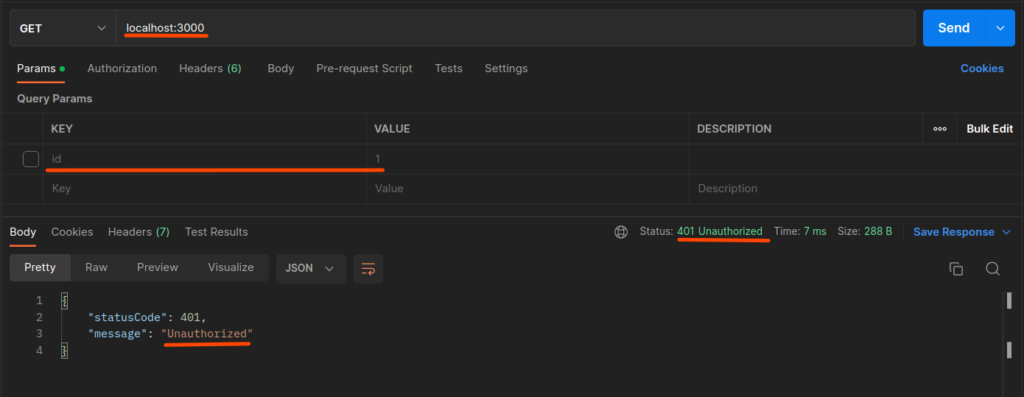
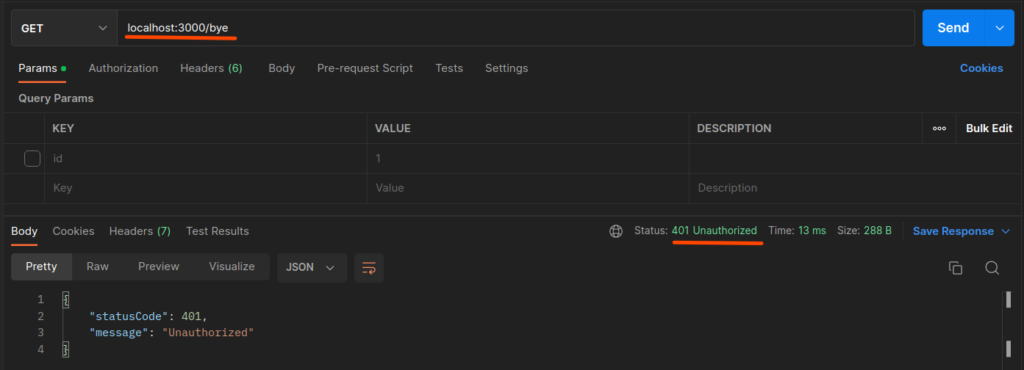
The Guard is present in the getHello() method, and not present in the getBye() method so the guard will only work for the route: http://localhost:3000 and not for http://localhost:3000/bye as one is protected by a guard and the other isn’t. let us test the APIs out.
Protected By Guards

id=1 is provided
Unprotected Routes

Now, let us look at applying Guards in NestJS globally. For applying Guards globally we need to apply the guard in the main.ts file, or the starting point of the application. We need to add the code app.useGlobalGuards() there to add the filter globally, let’s look at the code below.
//* main.ts

import { NestFactory } from '@nestjs/core';
import { AppModule } from './app.module';

async function bootstrap() {
  const app = await NestFactory.create(AppModule);
  app.useGlobalGuards(new AppGuard());
  await app.listen(3000);
}
bootstrap();
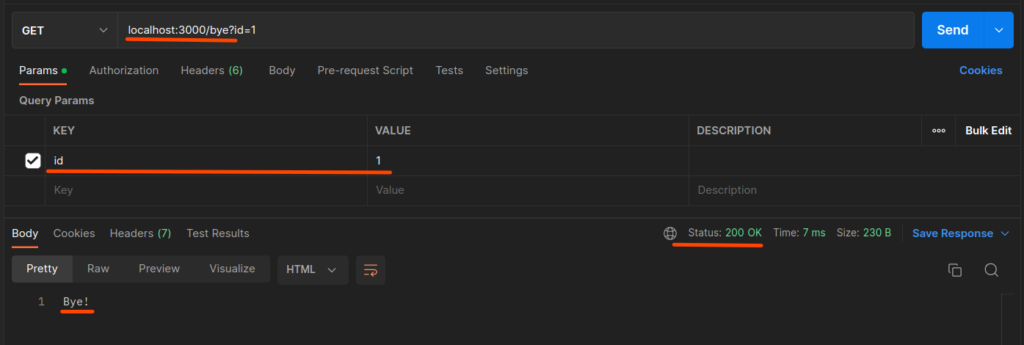
Now let’s test out the /bye route which was not protected by the guard, previously now it is protected by the global guard.


id=1 is providedNow, we have looked at applying Guards in NestJS, let’s look at the difference between Middlewares and Guards in NestJS.
Guards and Middlewares Differences and Similarities
Guards and Middlewares act similarly, meaning they have access to the request and response object. In middleware, they are present by default. Whereas in the case of guards, you have access to the context object. Through this, we can access the request and response object by switching the context. Both guards and middleware handle the request before it goes into the actual route handlers.
The difference between middleware and guards can be seen in the way that it is implemented. The guard can be used by using the @UseGuards(GuardClass) on top of the route that is handling the request, or if you want to use the Guards globally you can do it in the main module by using app.useGlobalGuards(new GuardClass()) the guard is now used globally for every route.
In the case of Middleware, it is done by implementing the NestModule interface on the module class where you want to use the middleware, then applying the middleware on a given route by using configure(consumer: MiddlewareConsumer) { consumer.apply(MiddlewareName).forRoutes('routeName') }. The middleware can be applied route-specific or globally by using the same concept. The Guards are executed after all the middleware present in the route handler is run.
As we can see that the Guards are simpler to implement as it has less of a boilerplate code when it comes to implementing it on the routes that handle the requests.
Conclusion
In this article, we learned about using guards in NestJS. We looked upon a practical example of it, and at the end, we also looked upon the similarity and differences between Middlewares and Guards in NestJS. Like guards, there are also interceptors to learn more about NestJs interceptors look into our article How To Use Interceptors in NestJS.
